Quick Links
Overview
The Bulk Check-In/Check-Out was created to streamline the check-in and check-out function in Firefly, allowing clerks to select multiple reservations to check-in or check-out at once.
The Bulk Check-In/Check-Out Screen
- From the left-hand side menu in Firefly, go to Settings > Bulk Actions
- From here, you can filter you screen based on actions you wish to take
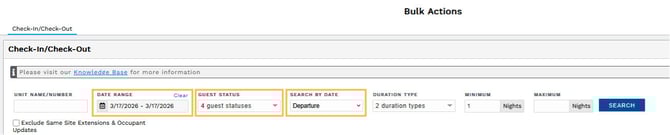
Filtering Options:
- Unit Name/Number
- Date Range
- Guest Status (Not Checked-in, Checked-in, Checked Out, No Show)
- Search By Date (Created, Last Status Change, Arrival, Departure, Any Part of Stay Range)
- Duration Type (Night, Day Use)
- Minimum Nights
- Maximum Nights
- Exclude Same Site Extensions (If checked, this will not display extensions done on the same site)
Print & Selection Options:.jpg?width=670&height=300&name=bulk%20checkin(1).jpg)
- Like all reports in Firefly, the Bulk Check-in/Check-Out screen can be printed or downloaded.
- To make it easier to select multiple reservations at once, use the status selectors at the top (Select All Not Checked In, Select All Checked In, Select All Checked Out, Select All No Show)
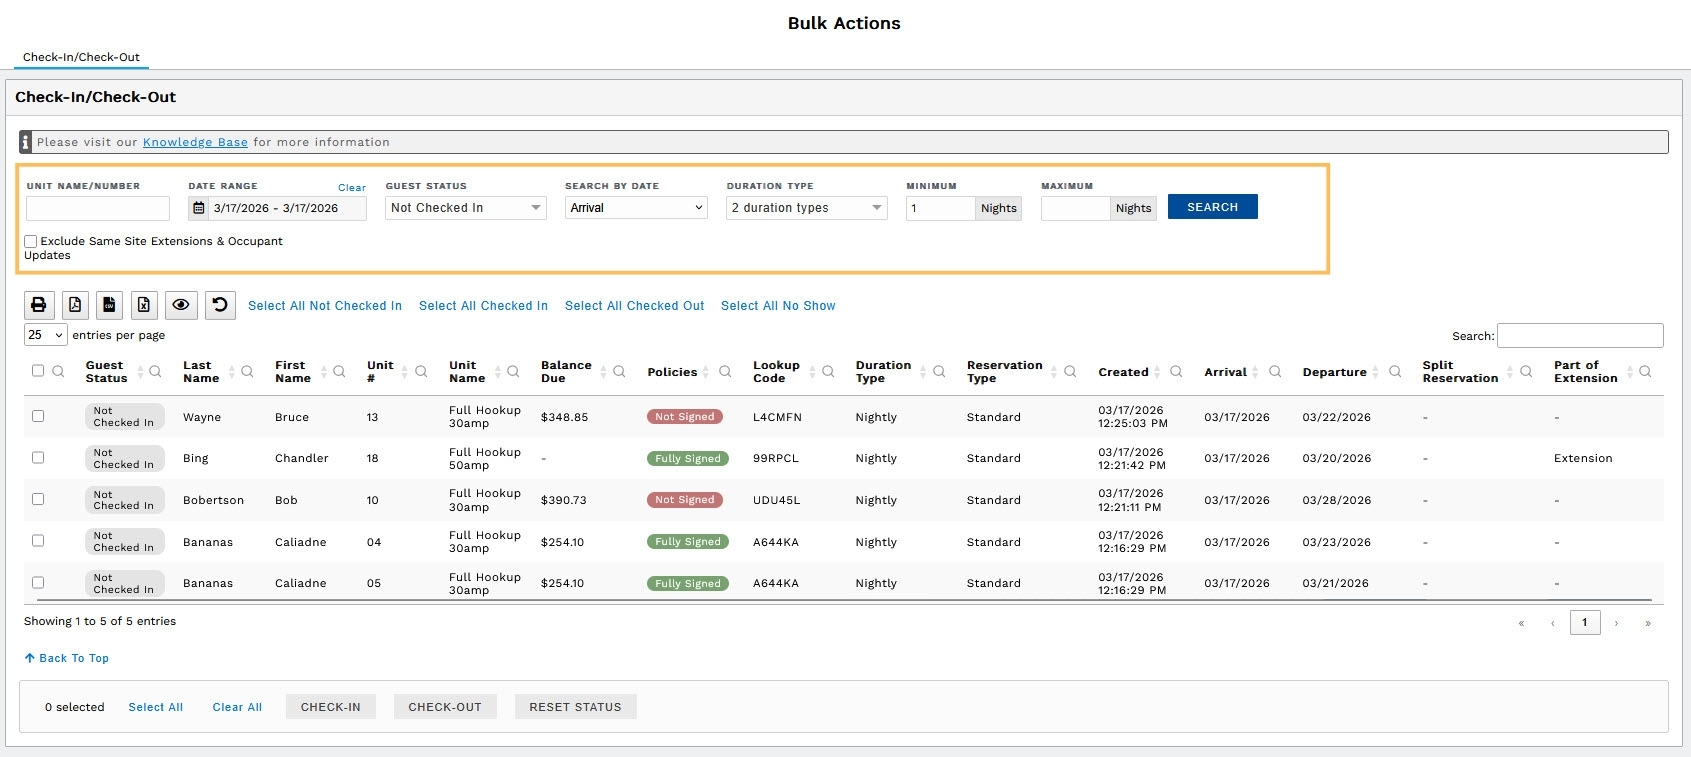
Search Results:
.jpg?hsLang=en)
-
Once you've loaded your filtered list, you'll be able to see information about each reservation. You can click the column headings to sort if desired. You can also click on the entry to go that specific booking.
-
Split Reservation: this will show if the reservation has been split by an Occupants Update, or Moved Unit change.
-
Part of Extension: Extended means that there is an extension following this portion of the stay; Extension means that this record is an extension.
-
Actions to Take:
.jpg?hsLang=en)
- Select All: select all reservations loaded in the list
- Clear All: clear all reservations selected in the list
- Check-In: perform bulk-check-in, and set all selected reservations to checked-in
- Check-Out: perform bulk check-out, and set all selected reservations to checked-out
- Reset Status: reset all selected reservations to to Not Checked In, regardless of their current status
Bulk Check-in
- From the Bulk Actions screen, set your date range to the date for which you'd like to search for guests to check-in. You'll want the Guest Status to be set on Not Checked In.
- Set any additional filters you need.
- Once your filters are set, click Search to load your list.
- For example, if you're doing this every morning, you would set the date for today, the Search By Date to Arrival, and the Guest Status to Not Checked In. This will show anyone anyone arriving today who hasn't been checked in yet.
- If you'd like to check in a certain group of customers, like all of your seasonal guests, set the Search By Date to Arrival, the Guest Status to Not Checked In, and put the Minimum Nights to the amount of nights in your season (for example, 180 nights).
- Select the reservations you wish to check-in, either by manually checking the boxes or using the Select All Not Checked In, or Select All options.
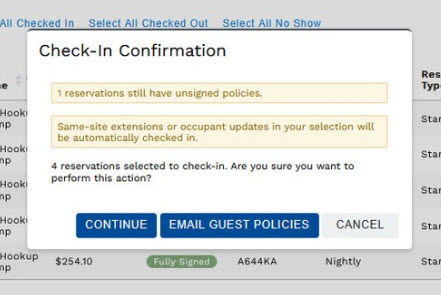
- At the bottom of the screen, select Check-In which will prompt a Check-In Confirmation pop-up.
- If all of your guests have signed the policies, click Continue.
- If you still have guests that have not signed the policies and you'd like to email them them, click Email Guest Policies. This will bring up a secondary screen to confirm they all have an email on file.
- If you have guests that have not signed the policies and you still want to check them in, click Continue.
.jpg?width=670&height=138&name=bulk%20checkin(5).jpg)
Bulk Check-Out
- From the Bulk Actions screen, set your date range to the date for which you'd like to search for guests to check-out. You'll want the Guest Status to be set on Checked In.
- Note: You cannot check out guests who have not been checked in.
- Set any additional filters you need.
- Once your filters are set, click Search to load your list.
- For example, if you're doing this every day, you would set the date for today, the Search By Date to Departure, and the Guest Status to Not Checked In. This will show anyone anyone departing today who hasn't been checked out yet.
- Select the reservations you wish to check-in, either by manually checking the boxes or using the Select All Not Checked In, or Select All options.
- At the bottom of the screen, select Check-Out which will prompt a Check-Out Confirmation pop-up.
.png?width=511&height=344&name=bulk%20checkin(1).png)
- If any guests have a balance due, you will receive a message in the pop-up. You can choose to Continue with the check-out, or Cancel to handle the balance first.
🙋♀️ Still need help? Email: support@fireflyreservations.com and one of our technicians can help answer your questions.
💭 We would love to know if this article was helpful in addressing your issue. If you could answer the question below it will notify our team. Thank you!