Firefly's point-of-sale (POS) feature allows you to quickly conduct a sale at your property's store, snack shack, propane station, or fuel pumps. POS transactions can be processed as a stand alone action or may be charged to a guest account or reservation for payment at a later date.
This article shares an overview for all areas of Firefly's POS feature. For more detailed information on the setup and use, see: Firefly Point of Sale Setup and Use.
For a quick walkthrough of Firefly's POS, check out these sections below:
Quick Links
Restore Previously Deleted POS Item
POS Items and Categories
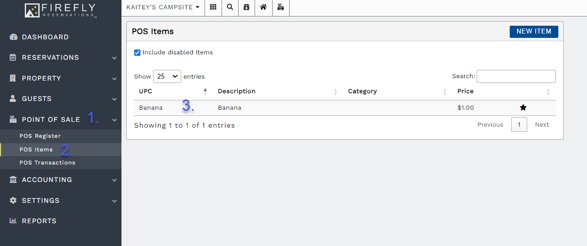
Before you can use the POS Register, you must set up your POS Items. Click POS Items from the main menu, under the Point of Sale dropdown.
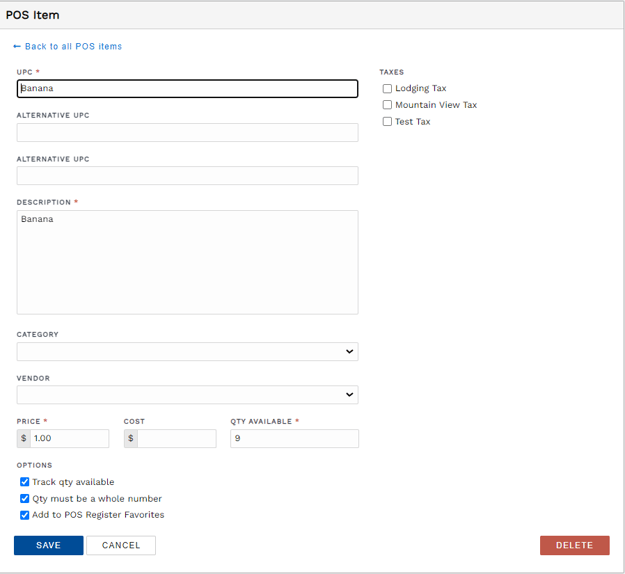
Click New Item to begin adding a new item. Enter all the item details in the dialog that displays, and select Save.
 Add a new POS item in order to use the POS register
You can add your most used POS items to your Favorites list so you can select them with a single click in the POS Register. You also have the option to set up POS categories and vendors. Grouping items within categories gives you efficiency to quickly find items in the register, edit taxes and item setup for all items in the category, and run detailed reporting. To set up categories and vendors, click POS Item Categories or Vendors from the menu under Settings. Once all POS items have been added, you are ready to use the register.
POS Register
To open the register, select POS Register from the main menu under the point-of-sale section. If you have a barcode scanner plugged into your computer, you can scan the barcode of your product now. If not, enter the UPC using the keyboard, and push enter to add the item to the transaction. Notice your favorited POS items show on the favorites list so you can quickly add them.

Click Here for a 30-second video
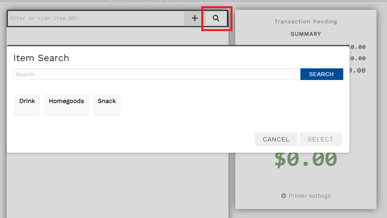
If the product is missing a barcode, you can use the search button to find the item by description. Click the search button (with a magnifying glass icon), enter at least part of the description and click the search button, or utilize the quick buttons that filter items by category.
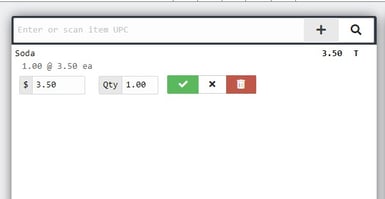
You can edit an item's quantity or price by clicking the item. Update they quantity or price and click the green check mark to save. The new amount will be reflected in the total.
POS Payments
Payment options appear on the right side of the POS register as soon as one item is added to the transaction.
IMPORTANT: When a payment is applied to a POS transaction, the cart is locked and no additional POS items can be added. If additional items are desired after taking a payment, you will start a new transaction.
When all desired items are added, click Cash or Credit/Debit Card for expedited checkout.
 POS register payment options with expedited buttons for cash and cards
Clicking the green Cash button, shown above, opens the Add Payment pop-up with a dedicated cash payment menu. This allows you to manually enter the amount of cash received and then click Save, or you may choose a one-click button in the Suggested Amounts section. These one-click cash options are for exact cash or a denomination commonly received for the balance due total.
 Cash dedicated payment menu opened with green Cash button
Selecting the blue Credit/Debit Card button, shown above, opens the Add Payment pop-up with Credit/Debit Card already selected as the payment method and the sale amount filled in. To complete the payment, you only need to select the process method and click Save.
 Card dedicated payment menu opened with blue Credit/Debit Card button
To go straight to the full payment menu, click the blue Add Payment button.
 Add Payment button opens the full menu of payment method options
The Add Payment pop-up appears. This is where you may view all available payment methods set up. To complete a payment, select the guest's desired option so you may confirm the payment amount, add optional notes, and click Save.
The Print Receipt button appears when the balance due is $0.00. If you have a Star brand printer and direct print enabled, a receipt will automatically be printed when the button is clicked.
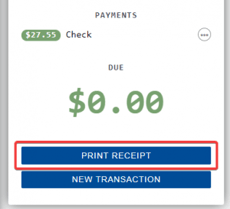
If you do not have a Star brand printer or direct print enabled, you will see a preview of the receipt in a new browser window when clicking the Print Receipt button. To print a POS payment receipt, you will use the browser's print functionality.
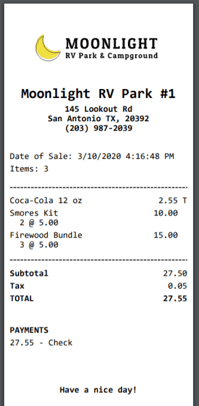 Example of a completed POS transaction receipt
The POS register's default receipt width is 3 inches, which fits most standard receipt printers. If printing a POS receipt on a standard office printer, the receipt size does not change.
Automate receipts and new transactions. Options for the end of a POS sale improve your staff's efficiency and help the focus remain on serving your customers. At the very bottom of the transaction summary box, are three options to auto print receipt, auto email receipt, and auto next transaction. These may be enabled or disabled at any time and take immediate effect for the current transaction.

POS Transactions
To view a list of POS transactions, select the POS Transactions menu option from the point-of-sale section of the main menu. You will see both completed and pending transactions. Click on a transaction to go to the POS Register and view that transaction.
 point-of-sale Transactions
Point-Of-Sale Used in a Campground Store
Disable Point-of-Sale Items
If you have an item that you no longer wish to use, you can disable (delete) this item. To do so, follow the steps below:
- Click point-of-sale on the left menu
- Click POS Items
- Click on the item you wish to disable
- Click "Delete" in the bottom left corner
- Click "Delete the item" to confirm
Note: To see the disabled item, check the box next to "Include disabled items" at the top of the POS Items screen: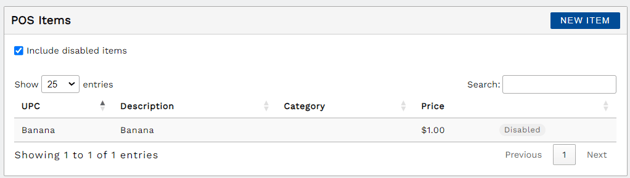
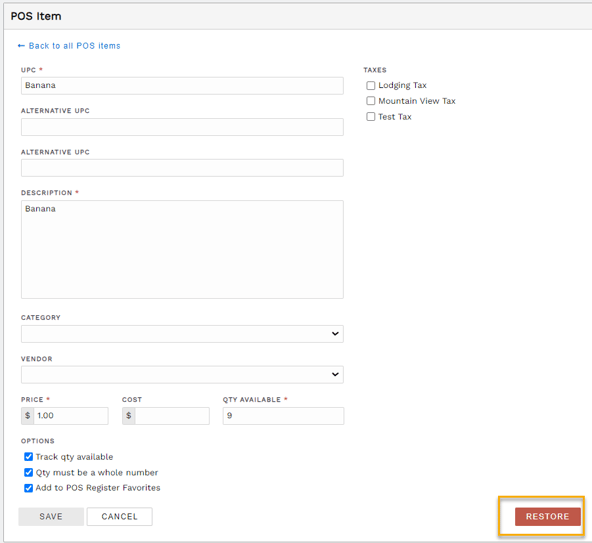
Restore Previously Deleted POS Item
To reuse an item that was previously deleted you can restore any POS item.
- Click point-of-sale
- Click POS Items
- Check the box next to "Include disabled items" at the top of the screen to include all disabled items
- Click on the disabled item you wish to restore
- Click the Restore button in the bottom right