Quick Links
Firefly's IZCloud Integration Setup
- Request IZCloud Integration
- Subscribe to The Account Addon
- Configure Property Time Zone
- Require Vehicle Information
- Connect the Integration
Test the Integration and the Gate
Use the IZCloud Integration in Firefly
- Visitor Add-ons
- Guest Portal Vehicle Updates
- Front Desk Vehicle Updates
- Firefly Vehicle and Visitor Reports
- What can I expect to see in my IZCloud List Manager?
- When does Firefly send data to IZCloud, and what is sent?
Overview
Firefly and IZCloud's integration utilizes vehicle license plate information to provide a win for all, both gated and gateless properties. Gate access is not required to benefit from the documentation of visitors, alerts for unrecognized or blacklisted vehicles, and notifications for vehicles on a watch list. Gated properties get the added benefit of automated gate access which affords your property efficient management of guest and visitor entry.
If you are unfamiliar with InexTech or their IZCloud Access Control system, check out this reference sheet: InexTech and Firefly!
Once you are setup as a customer with InexTech, come back to this page for a walkthrough on how to set up the integration. Please don't hesitate to reach out to if you have any questions!
Firefly's IZCloud Integration Setup
Request IZ Cloud Integration
Send an email to support@fireflyreservations.com to request activation of the IZCloud integration on your Firefly account. Once the Support team confirms this has been completed, you may proceed with the next steps.
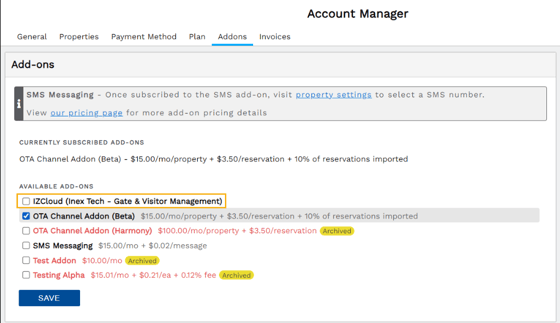
Subscribe to The Account Addon
- In the top right corner of Firefly, click the username's dropdown > select Account
- Navigate to the Addons tab
- Check the box next to IZCloud (Inex Tech - Gate & Visitor Management)
- Click Save
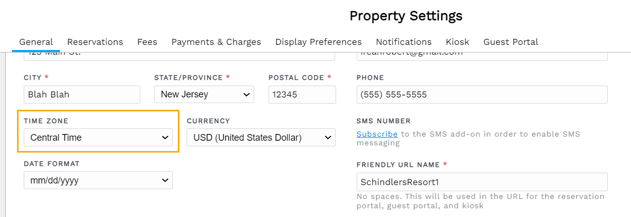
Configure Property Time Zone
All parks should ensure their property's Time Zone setting is accurate. This ensures gate functionality works as intended, since reservation details are stamped with the time zone setting in place before being sent to IZCloud. If a time zone is incorrect, you may experience denied access for valid guests or undesired access for invalid guests.
If incorrect times were sent, a resync or a disconnect-reconnect will resolve discrepancies.
To set confirm or edit the time zone:
- On Firefly's main menu go to Settings dropdown then select Property.
- On the General tab, click the Time Zone dropdown. Select appropriately then click Save.
Require Vehicle Information
To use this integration, you must require all guests to provide vehicle information.
- On Firefly's main menu, click the Settings dropdown and select Property.
- On the Reservations tab, scroll down to the Vehicle Info Options section.
- Check the box to "Require at least one vehicle for all unit types".
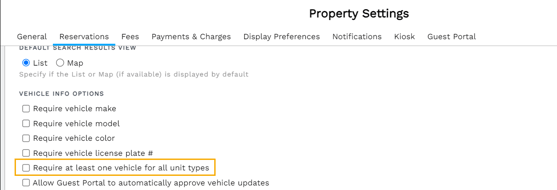
- Be sure to click Save at the bottom of the page.
During the booking process, after selecting a unit to reserve, guests must enter the following vehicle information:
- Make
- Model
- Color
- License Plate
Here is an example of what guests see and must complete to continue booking the reservation: 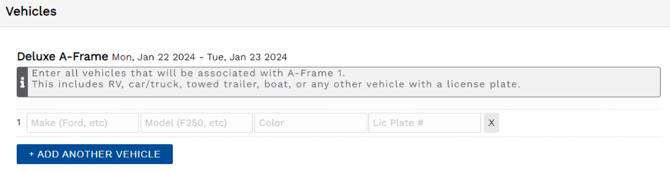
Connect the Integration
IMPORTANT: IZCloud equipment must be fully set up at property first.
Once your IZCloud account and equipment is set up, the integration is enabled on your Firefly account, you have enabled the addon, and configured your Property Settings, you are ready to connect your IZCloud account with Firefly and finalize the integration.
You may have previously seen the Integrations page labeled as Channel Management. This was changed to better reflect the ever increasing partnerships Firefly is developing to help you optimize your property's productivity and efficiency.
To connect your IZCloud integration:
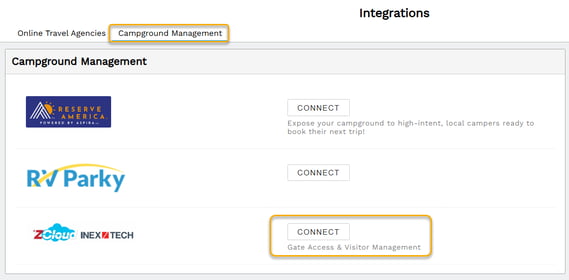
- On Firefly's main menu, click the Settings dropdown then select Integrations
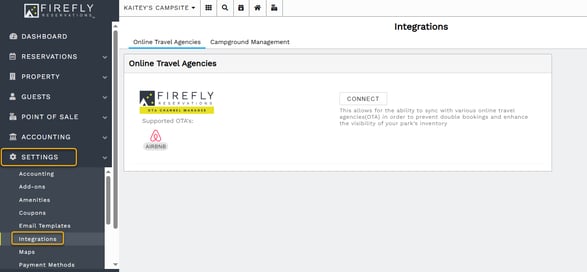
- Click the "Campground Management" tab then select "Connect" in IZCloud's section.
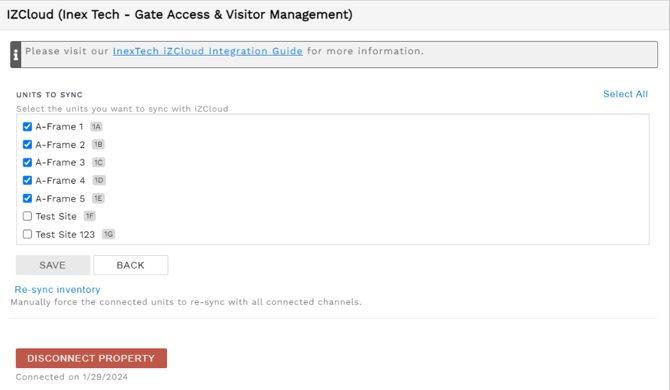
- You will be prompted to enter information for you IZCloud account:

- Username/Email: Provided by InexTech. There could be two different usernames given to a user by InexTech - one for the API integration, and the other for the park’s management website through InexTech.
- Password: Provided by InexTech. This will only need to be entered once.
- Tenant ID: Provided by InexTech.
- Account: Provided by InexTech. Will most likely be the name of the park/property.
- List ID: Provided by InexTech. This is the identifier of the Allow List. Firefly will insert records into this list and the gate system will use this list to validate the license plate numbers and data time ranges.
- Check Out Time: This is the time a guest's access is valid through on the day of checkout. Setting the unit status to “Checked out” will remove the record from the gate access system. By default, this time is set to 11:30 AM since most locations have checkout policies for 11 AM. To allow the gate to work all day, users should set the time to 11:59 PM - setting the time to 12:00 AM will give zero time for the day of checkout.
- Mode:
Demo Mode: Firefly staff use only. For validation, demos, and development.
Live Mode: Default mode. Should be selected for all properties, whether testing or using for live operations. - Options:
Ignore Check-in Status: Selected by default. When checked, a guest's access is enabled at 12:00am on the arrival day. This means a gate will open for the guest any time on their check-in day. If the option is disabled (unchecked), then a guest's reservation must be checked in before the system allows the guest access.
- Click Connect Property. If all information is entered correctly, the connection is established.
Link or Unlink Units
Since parks may choose to not link all units to the access control system, units may be linked or unlinked at any time. Clicking the “Save” button after unit changes are made allows Firefly to search reservations for all vehicle license plates that need to be added or removed on IZCloud.
Test the Integration and the Gate
It's always best to test! We highly recommend you test the integration as well as gate function.
You will want to use a vehicle you have access to, either a park vehicle with a license plate or a staff member's vehicle. Testing also requires editing a reservation, so we recommend parks have a test reservation that can be used for testing purposes. If you need more information about a test reservation, reach out to support@fireflyreservations.com.
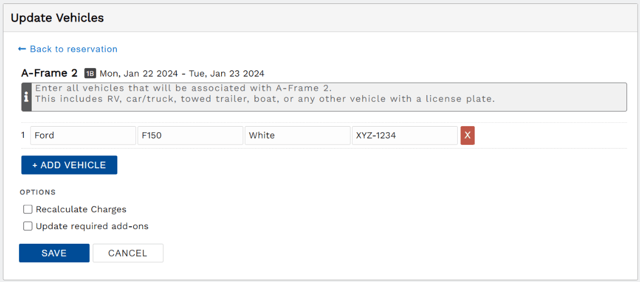
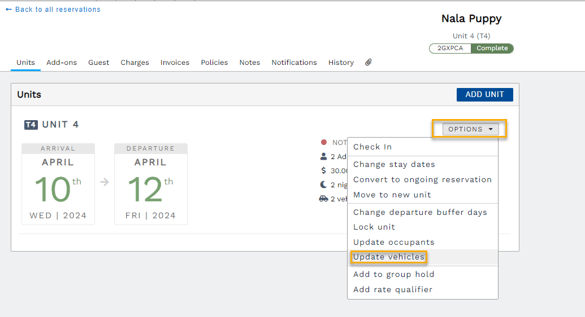
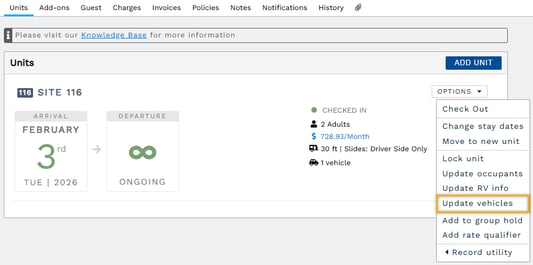
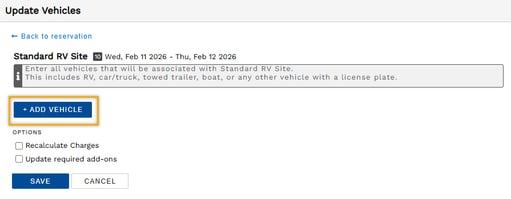
- On a test reservation's Units tab, click the Options dropdown then select "Update vehicles".
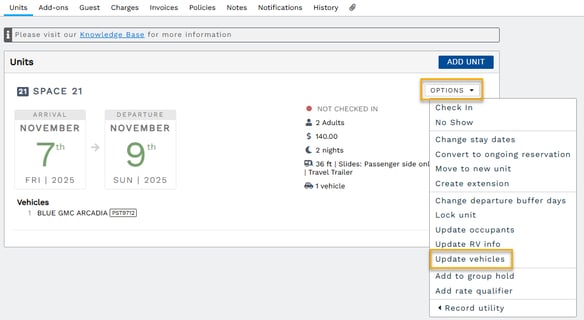
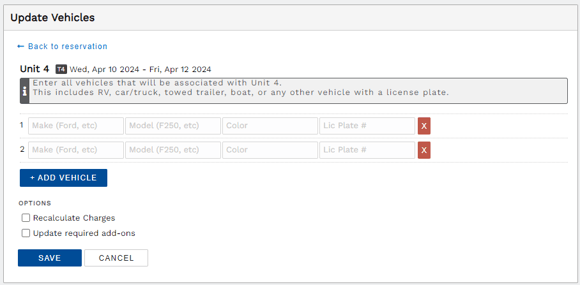
- Click "Add Vehicle".
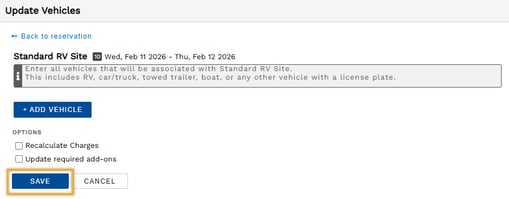
- Vehicle information fields appear. Enter the testing vehicle's details then click Save.
- Drive to your gate (in real life) and see if the access you have set up works!
Use the IZCloud Integration in Firefly
Visitor Add-ons
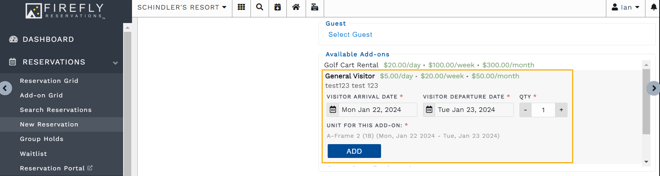
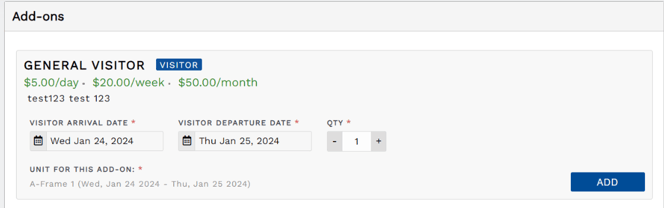
Visitors may receive automated property access through a reservation's Add-ons feature. Visitor add-ons can be included in a reservation during the initial booking or can be added to an existing reservation. When selecting this addon, Firefly collects the visitor's arrival and departure dates as well as quantity.
New Reservation Visitor Add-on: Reservation Portal
From here, under the units tab in the reservation detail, the user can click “update vehicles” under Options. Once all vehicle info is added and saved, this will then be displayed via the units tab under the given unit(s) within the reservation detail.
New Reservation Visitor Add-on: Front Desk
Existing Reservation Visitor Add-on
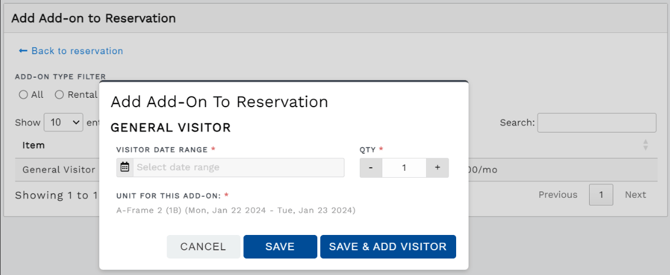
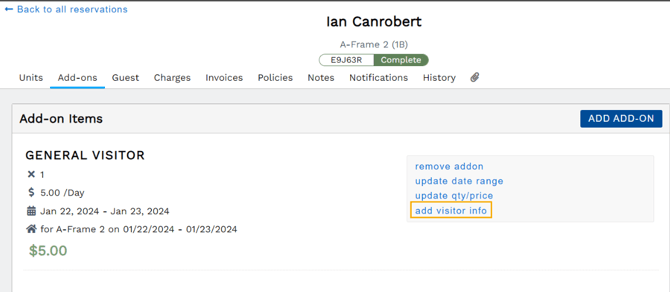
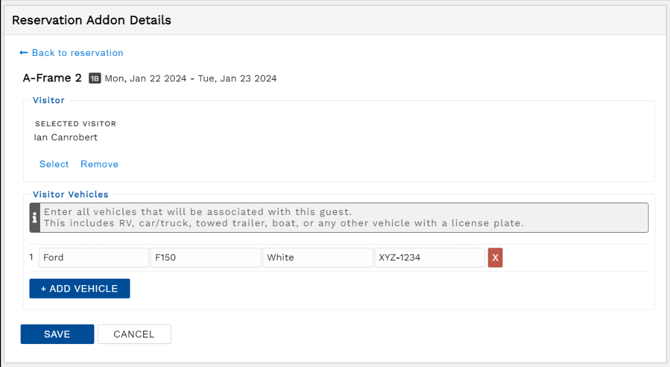
If the user is adding this addon after the reservation has been created, they will need to visit the reservation Addon tab. From here, when adding an addon, a window will popup and allow the user to enter the date range and the reservation unit for that visitor addon. If the user selects to “add details” in the popup window, they will be directed to the Reservation Addon Details page. From here, the user can select a visitor to be associated with the addon they just added. This can also be done by selecting “add visitor info” next to the visitor addon from the reservation detail Addons tab. From this page, the user should also add all vehicle info associated with that visitor.
This can be updated at any time from the reservation detail Addons tab next to the addon.

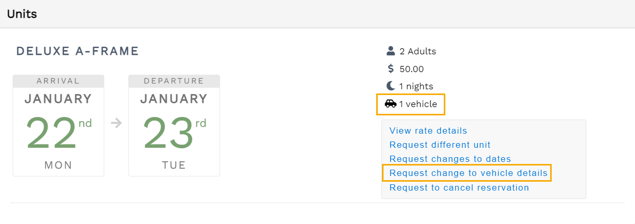
Guest Portal Vehicle Updates
Guests may update their vehicle information as needed in their reservation's Guest Portal.
Property settings allow a guest's edits to be automatically accepted or a request pending property staff approval.
To
Guest Portal > Reservations (tab), two things have been added:
-
The # of vehicles connected to the given reservation
-
The option to “Request change to vehicle details”
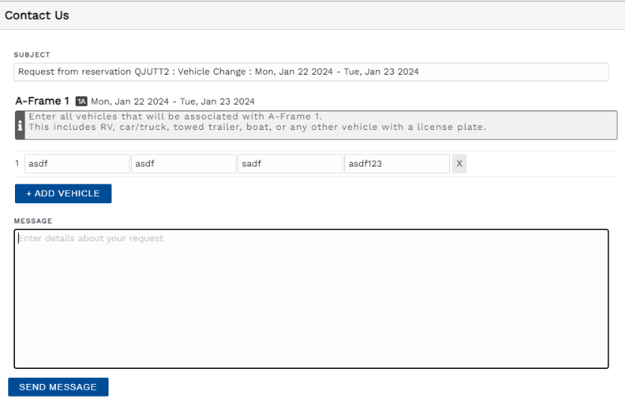
When #2 from above is selected, the user will be redirected to the Guest Portal > Contact Us page. From here, Firefly will pull the vehicle details from the reservation unit and display them for the email form.
-
If Settings > Property > Reservations (tab) > Vehicle Info Options > “Allow Guest Portal to automatically approve vehicle updates” (button) is checked, the vehicle updates will save automatically, but the park will still be notified of the change, even though no manual intervention would be needed. This setting is optional.
-
The email form will include:
-
Subject Line
-
Vehicle info per unit in the reservation (Make, Model, Color, License Plate)
-
Message to park
-
Guest Vehicle Management
To add initial guest info:
- Go to the reservation's Units tab, click on the Options dropdown
- Select Update Vehicles
- Enter vehicle information, select desired options, and click Save.
CAUTION: Guest access through an automated gate requires a vehicle be connected to a reservation. Once a vehicle is added to a reservation, the vehicle information may be edited in the reservation or in the guest profile.
Front Desk Vehicle Updates
Vehicle information may be added to a reservation or a guest's profile. Adding vehicles on a reservation is essential to allow gate access, this is currently a one-time addition that must occur on each of the guest's reservation. Reservation vehicles are not automatically nor permanently associated with a guest's profile.
If you would like to track vehicle information on the guest profile, you must add it to the guest profile. Vehicles saved to a guest profile are not shared with reservations. Vehicles must still be added to a reservation to allow gate access for the reservation stay.
Vehicle updates on a reservation:
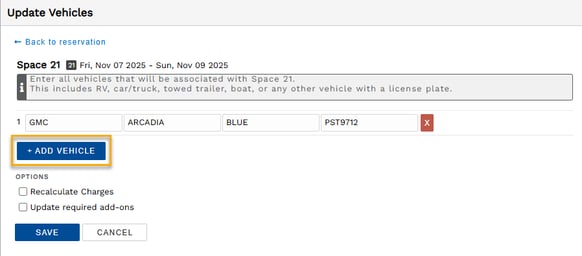
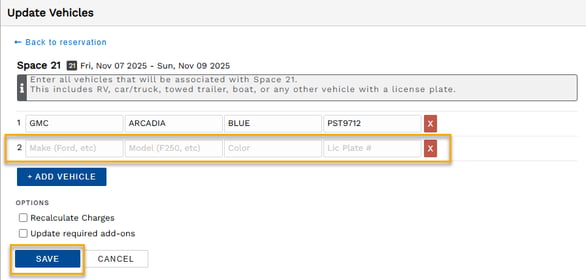
- On a reservation's Units tab, click the unit's Options dropdown to select "Update vehicles".
- Click the blue Add Vehicle button.
- Enter vehicle information and add additional vehicles, as necessary.

- Be sure to remove unnecessary extras, these will save as unidentified vehicles.

- Select desired options to recalculate charges or update required add-ons.

- Click Save.
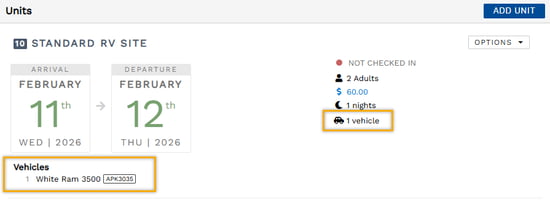
- You will return to the reservation's Units tab to view your vehicle additions.
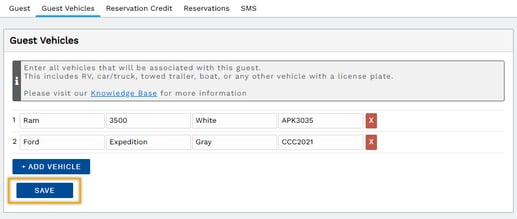
Vehicle updates on a guest's profile:
- Navigate to a guest's profile from the main menu (Guests dropdown > Search Guests) or go to a reservation's Guest tab to select "Edit Guest"
- Click on the Guest Vehicles tab to add or edit vehicle information.
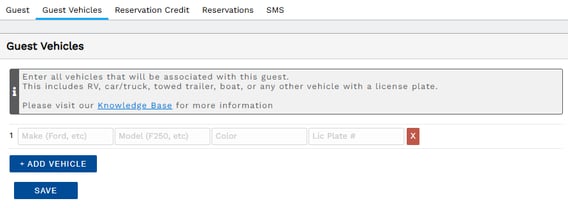
- Be sure to click Save when finished.
Firefly Vehicle and Visitor Reports
Firefly offers multiple reports related to your IZCloud integration. The reports below help staff monitor and manage guests as well as visitors. Each report's access is granted through a unique user permission.
All reports are found on the Reports page, accessed from the main menu.
- Add-on Visitors: Displays a list of all add-on visitors for the date range selected. Found in Add-ons section
-
Reservation Guests & Visitors: Displays guests and visitors with a reservation during any portion of the date range selected.
-
Reservation Guests & Visitors (Vehicles): Displays guest and visitor vehicle detail for a reservation during any portion of the date range selected.
-
InexTech IZCloud Active Access List: Displays the InexTech Active Access List. This is the same list from the InexTech console.
NOTE: If a report listed above is not found, the report's permission is disabled.
IZCloud's List Manager
What can I expect to see in my IZCloud List Manager?
If all settings are properly configured, and the rules to when the data can be pushed are set to what the park wants, then Firefly's integration will be able to push data to the IZCloud list.
Here is an example of InexTech's IZCloud Active Access List report: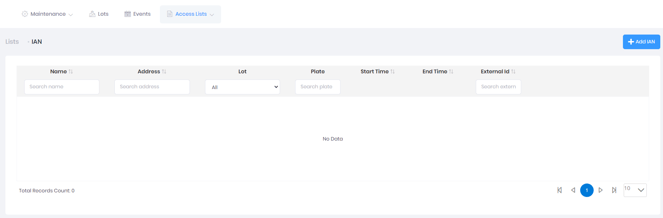
TIP: On Windows devices, you may right-click any image in the Knowledge Base to select "Open image in new tab". A larger view of the image is displayed on a new browser tab, if available.
Why is my IZCloud List Manager empty?
New users should expect to see an empty list until all setup is complete and data has been pushed from Firefly.
You may also see an empty list if a property is connected to IZCloud without linking a unit.
If units are linked and reservations are in the system, but the list is still empty, the user should ensure the “Ignore checkin status” button is checked. If this option is not enabled, data will only be sent when the reservation status is set to “Checked in”. If the park isn’t doing check-ins, then this would explain why the list is empty.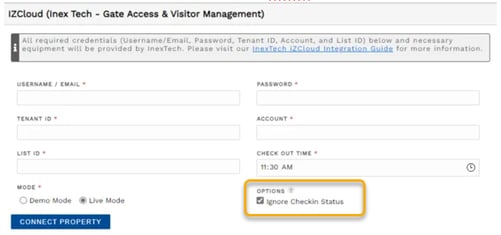
When does Firefly send data to IZCloud, and what is sent?
-
Reservation booked on the front desk by staff: License plate automatically added.
- Reservation booked on the Reservation Portal: License plate automatically added.
- Edit a reservation unit's details: Sends updated information
-
Start date
-
Departure date
-
Vehicle info changes
-
Moving a reservation from one unit to another - editing this could change dates or the unit going to or from might be linked or not linked to the gate integration
-
-
Change the reservation unit's status:
-
IF Not Checked In or Checked In is the reservation status and “Ignore checkin status” is checked, then the license plate info will show from the IZCloud list
-
IF Checked In is the reservation status and “Ignore checkin status” isn’t checked, then the license plate info will show from the IZCloud list
-
IF Checked Out is the reservation status and “Ignore checkin status” is checked” isn’t checked, then the license plate info won’t show from the IZCloud list
-
IF Checked Out is the reservation status and “Ignore checkin status” is checked is checked, then the license plate info won’t show from the IZCloud list
-
-
Cancel a reservation: Removes the license plate from the IZCloud list.
-
Changing a reservation unit to “Ongoing”: Sets the departure date to 2099.
-
Link or unlink a unit: Adds or removes license plates associated with the unit's reservations.