Quick Links
Create Transfer Files for QuickBooks
How To Balance After Your End of Day
Frequently Asked End of Day Questions
How to Do an End of Day Batch:
Running the End of Day
The End of Day procedure will batch out in a 1-step or 2-step process depending on the settings selected during accounting setup, which must be completed before you are able to use the end of day. Check out this guide for a walkthrough of accounting setup: Accounting Setup Guide
Simple 1-Step Method:
The 1-Step Method posts both your payment and transaction journal entries in one go.
No reconciliation process is necessary.
First, go to Accounting > End of Day. Enter your cut off date, and click Generate.
Note: The cutoff date will create entries for all dates between the last posting and the date entered.
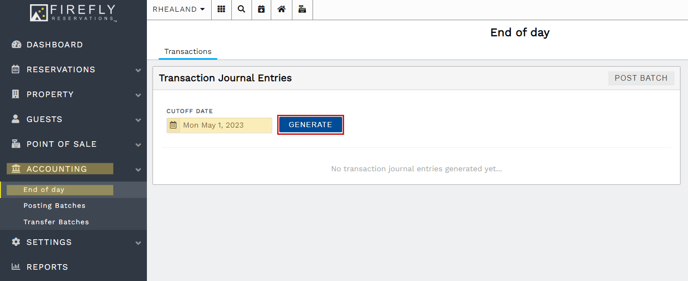
Upon clicking generate, you will see a list of entries for all general ledger codes affected. Use the tabs to view more information, and check that everything balances on the Summary tab. When you're ready to finalize, click Post Batch.
Advanced 2-Step Method:
The first part of the 2-Step End of Day method is to reconcile your payments. To begin, go to Accounting > End of Day. The payments tab will automatically be selected. Enter your cut off date, and click Generate.
Note: The cutoff date will create entries for all dates between the last posting and the date entered.
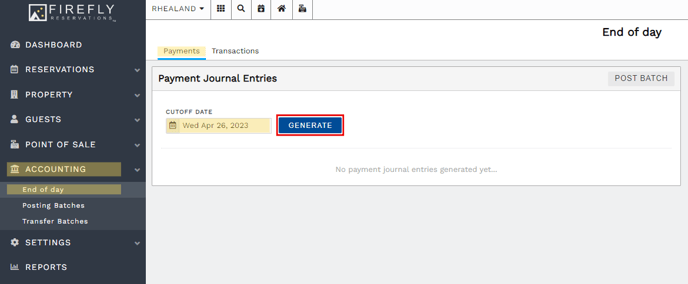
When you click Generate, you will get a list of all payments entered since the last update date.
On the Payments tab, you will find a list of all payments collected organized by payment method. For Cash, the actual amount collected (the cash counted from the drawer) will need to be entered. If there is a difference between the Expected amount and Actual amount, it can be written off to the write off account at the bottom.
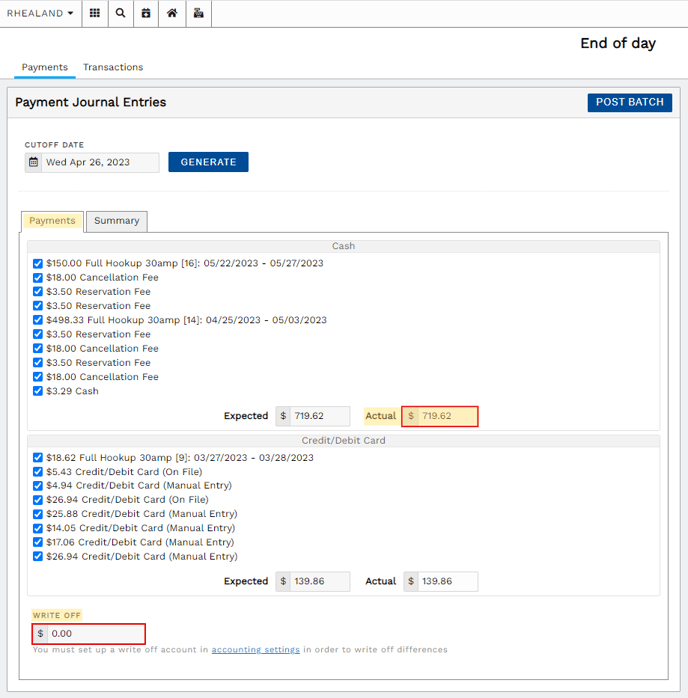
By clicking on the Summary tab, you are able to review the Journal Entries that will be affected upon posting. As this is the Payment reconciliation, only payment and deposit accounts should have entries created.
To post your batch, click "Post Batch" at the top. This will create the journal entries.
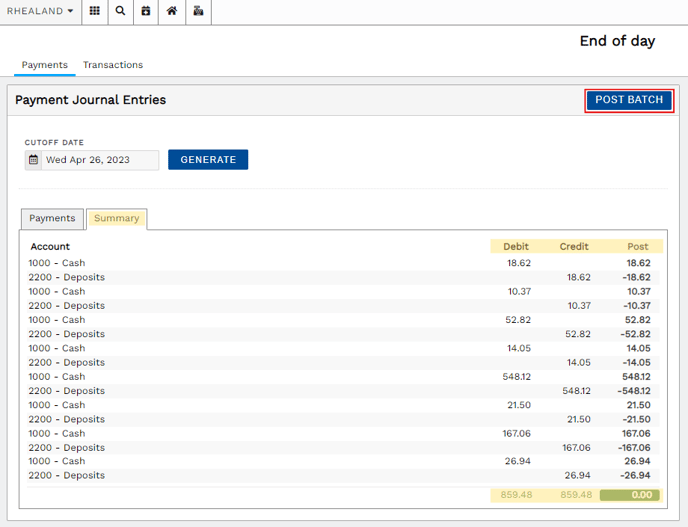
When prompted if you want to post the batch, click "Yes, Submit Batch."
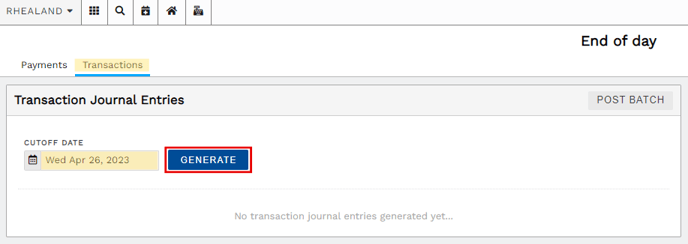
Now that your Payment Journal Entries have been created, it's time to create your Transaction entries.
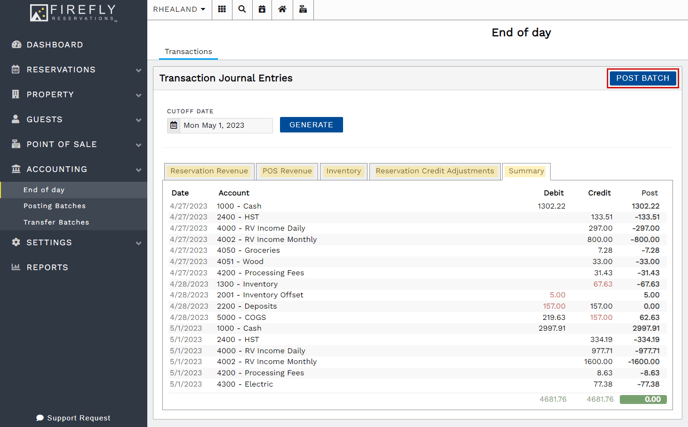
Click on the Transactions tab, and enter your cut off date. Next, click "Generate".
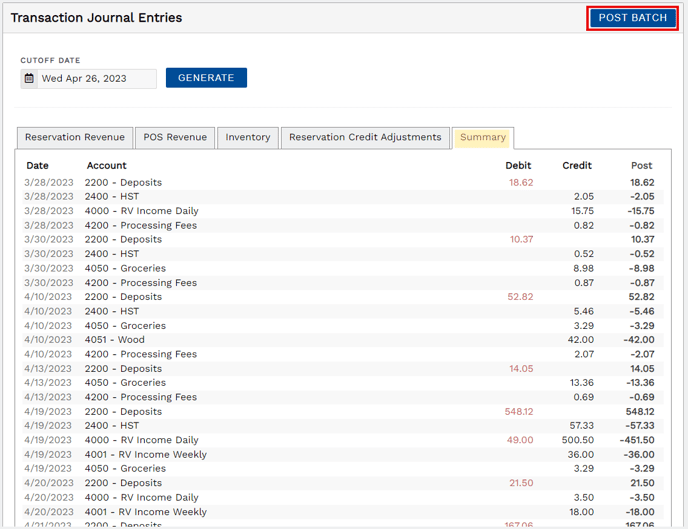
After clicking generate, you will see a list of all the transactional data including the journal entries for each financial account affected during that time frame. You can navigate through the tabs across the top to access the detailed information for your reservation and POS revenue, as well as your inventory assets, cost of goods sold, and reservation credits.
Summary will show you the debit, credit, and post amounts for each GL code broken down by day. To finalize your batch, click "Post Batch" at the top.
When prompted, click "Yes, Submit Batch."
NOTE: You may receive error messages processing your end of day. This article shares information and resolution tips: There are errors on my End of Day update!
Create Transfer Files for QuickBooks
When your End of Day posting has been done, go to Accounting > Transfer Batches to create your export file for QuickBooks. The transfer file can contain multiple days, so this does not need to be done on a day by day basis.
Checkmark the batches you wish to transfer, select your format (currently only .iif for QuickBooks is available) and click "Generate". This will automatically download an .iif file to your computer which can be imported into QuickBooks.
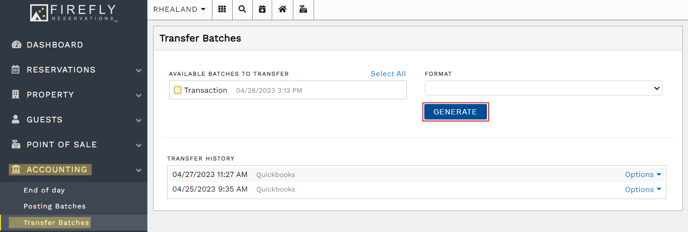
You may regenerate or delete a previously created transfer file. Click the Options menu to the right of the desired file. You may then choose to "Regenerate Transfer File" or Delete the file as appropriate and necessary.
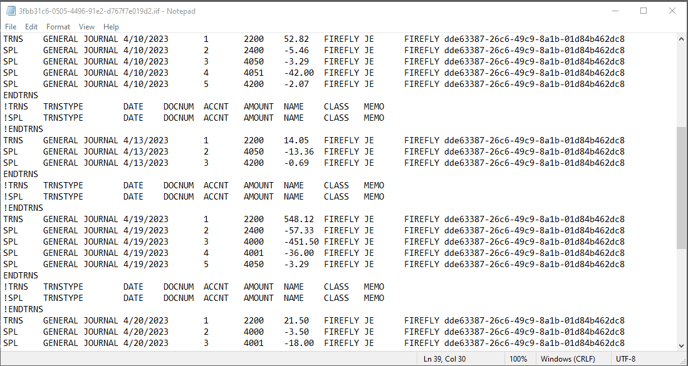
TIP: The .iif file can be opened in Notepad if you wish to view the file before importing. This also allows you to make edits if needed.
Posting Batches
To see a history of batch postings that have been done, or to undo a posting that was done in error, go to Accounting > Posting Batches.
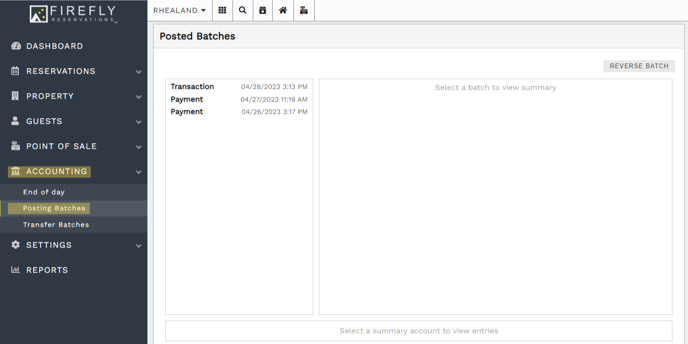
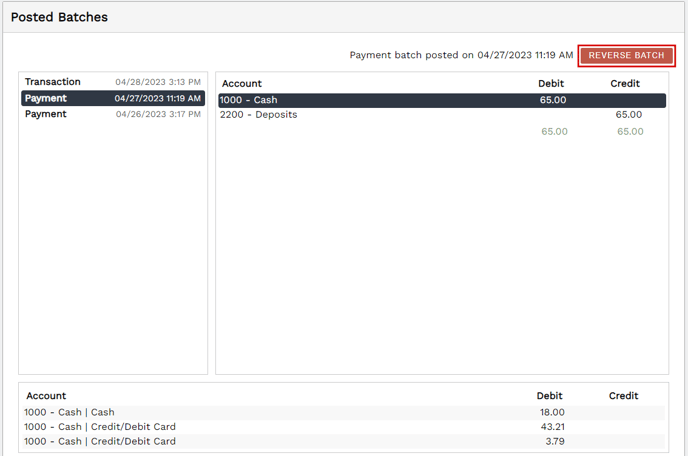
From the column on the left, you can highlight the batch in question, and see a summary on the right. Highlighting an account on the right, will show the details of each transaction that affect the account to the bottom. You can then click on a line item in the bottom display to be taken to that reservation or POS transaction.
Reverse a Posted Batch
You may find it necessary to reverse a posted batch if you discover a payment, refund, or financial account allocation needing correction. To reverse the most recent batch, highlight the batch then click "Reverse Batch" on the top right. This will undo the batch's posting.
If reversing a batch that is not the most recent, you must start with the most recent batch and reverse all batches until your desired batch is at the top of the list.
Journal Entries Reports
Firefly offers two reports to help you evaluate your journal entries data: Journal Entries and Journal Entries Summary. Both are found by going to Firefly's main menu > Reports > Accounting section.
Journal Entries shares each journal entry in a GL.
Journal Entries Summary shares Debits, Credits, and Post Sum totals for each GL.
For each report, you will choose the date range and GLs to include then click Run. These reports can be printed, saved as a PDF or exported as an Excel or CSV file.

TIP: For information about working with the data in a report, see: Running Reports.
How to Balance After your End of Day:
Frequently Asked End of Day Questions
- When should I do my close out?
We recommend doing your End of Day the following morning. Even though your office is closed, guests can still book and pay online. To ensure everything is within the correct calendar date, backdate your End of Day for a midnight cutoff from the day prior. - Do I have to do the End of Day everyday?
Not at all! Firefly will automatically separate the entries out day by day in the journal postings. However, it may make it harder to reconcile your till if many days are grouped together.
You can also choose to do the End of Day close out daily, but the Transfer Batches on a weekly or monthly basis. - Can I do more than one close out a day?
- Definitely! You can do multiple close outs a day if desired. Once a batch is posted, Firefly starts a new batch. Therefore, entries that have already been posted will not be affected.
- Am I able to make manual adjustments to the posted entries?
- While you can always edit the .iif file once its been created, you are also able to make a manual adjustment on the Posting Batches page. Go to Accounting > Posting Batches. Near the bottom, you will be able to select a financial account and enter the credit/debit adjustment amount. Click save.
 The adjustment will be recorded on the day it is done in the system, and have its own entry on the Posting Batches list.
🙋♀️ Still need help? Email: support@fireflyreservations.com and one of our technicians can help answer your questions.
💭 We would love to know if this article was helpful in addressing your issue. If you could answer the question below it will notify our team. Thank you!