Last Updated: July 30, 2026
Link to Feature: https://app.fireflyreservations.com/reservations (or click here then search for the reservation needed)
Quick Links
- Price, Quantity, and Taxes
- Charge Frequency
- "Create First Charge On" Date
- "End Recurring Charge On" Date
- Current Cycle
- Create Days Early
- Email Notification Option
- Automatic Payment Options
Overview
While Firefly automatically creates a recurring charge when a standard reservation is converted to ongoing, it is sometimes necessary to create additional recurring charges for things like reservation fees, utility services, park rental items, or services provided to the guest. These additional recurring charges are created manually.
Recurring charges are created and managed on the Charges tab of a reservation. Under the Summary box and above the Charges section, the Recurring Charges section is always visible. It remains even if no recurring charges are setup and the section is empty.
The Recurring Charges section is specifically for the creation and management of the reservation's recurring charge setup. The Charges section includes all created charges, which are sometimes referred to as posted charges.
The step-by-step instructions below walk you through creating a new recurring charge, and each step's detailed information is also helpful when editing an existing recurring charge.
IMPORTANT: Since it may be necessary to continue charges for a guest after a reservation ends, recurring charges can continue after a reservation's departure date. A guest also retains access to a reservation's guest portal for payment access since guest portals never expire.
Recurring charges do not end when a reservation is checked-out. You must ensure the recurring charge's setup or ongoing reservation has an accurate end date. Changing stay dates to enter a departure for an ongoing reservation automatically edits the end date of all recurring charges, to match the end date of the reservation.
Create a new recurring charge.
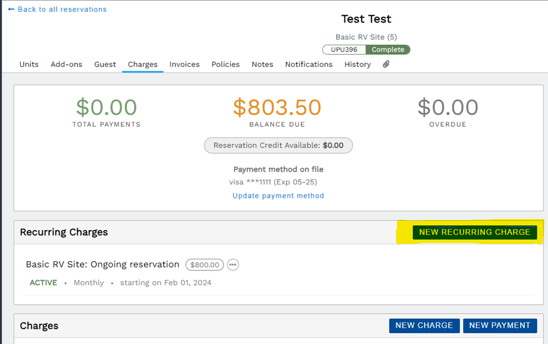
1. Manually create a new recurring charge.
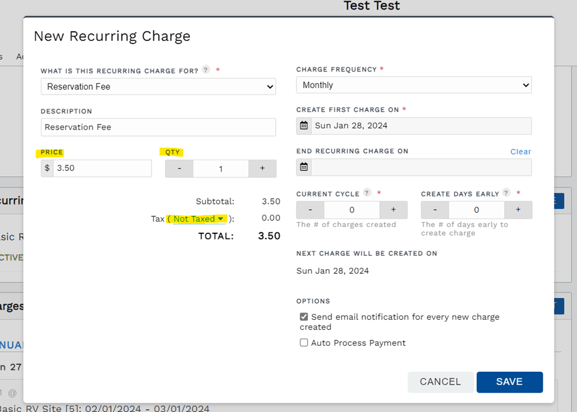
To manually add a recurring charge, go to a reservation's Charges tab. Find the Recurring Charges section. Select “New Recurring Charge”, highlighted below.
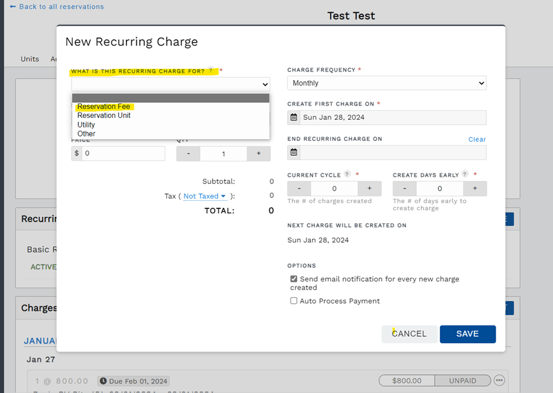
2. Select what the recurring charge is for.
In this example, we are creating a recurring charge for the $3.50 reservation fee, so that is what we will select.
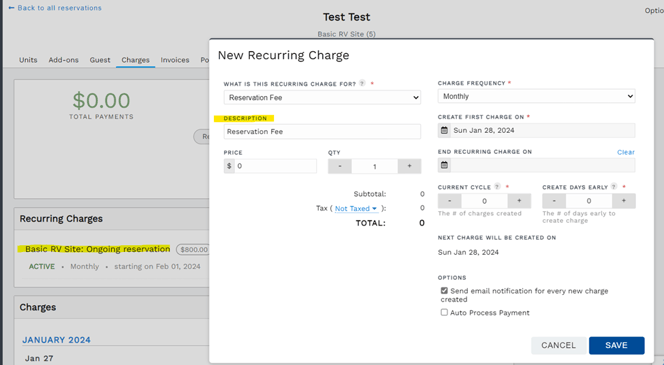
3. Write in a description of the charge.
The charge description is the title of the charge. This is what staff will see on the reservation's Charges tab and what the guest will see on invoices, their guest portal, etc.
4. Set the recurring charge price, quantity, and taxes.
Enter in the price or amount you will be charging to the guest.
The quantity can be a useful setting if a guest has multiple sites booked and you need to charge them at the base price of $3.50 but at a quantity of 2 to cover two sites. In this example, we only need to bill $3.50 once so we will leave the quantity at 1.
Apply taxes. If taxes are needed, you can select the tax dropdown and check all applicable taxes for the charge.
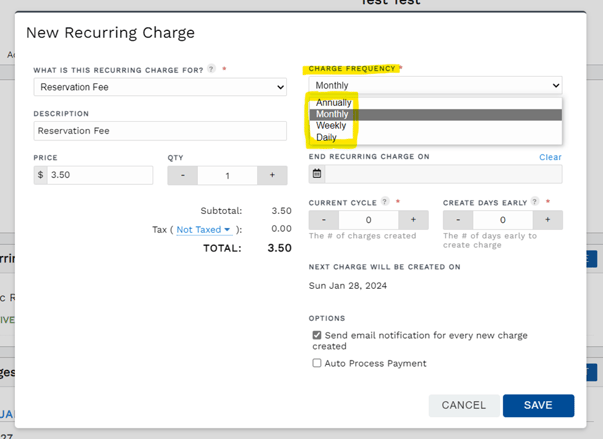
5. Set the Charge Frequency.
The charge frequency determines how often the charge will post. When creating a new recurring charge, the charge will be set to monthly by default, as this is most used. However, you may choose to post Annually, Weekly, or Daily instead.
6. Set the “Create First Charge On” date.
When creating a new recurring charge, this date is the charge's start date. Upon saving the new charge's setup, the system automatically creates the first charge for this date. The system will also automatically create additional charges at the selected frequency from this date. We often call this a charge's recurring date.
In the example below, the charge was set to start on May 1, 2026 and two charge have been created. Further charges will continue to create on the 1st of every month until the recurring charge is ended. The 1st is the recurring date.

7. Set “End Recurring Charge On” date, If applicable.
This is the day Firefly will no longer create the recurring charge. Leave the end date blank to post the charge indefinitely. When you enter a departure date for an ongoing reservation, this date is automatically set on the recurring charge as well so you do not need to enter an end date manually.
However, if you need to end a particular recurring charge ahead of the guest's departure date, you will set the end date here. Alternatively, if a recurring charge was previously ended and needs to be restarted, you may clear this date to reactivate the recurring charge.

8. What is the Current Cycle?
The current cycle represents the number of charges that have been created and are viewable on the reservation's Charges tab. When a recurring charge setup is created, the system automatically creates and posts the initial charge. This is true whether you manually create a recurring charge or the system automatically creates one to convert a standard unit stay to an ongoing unit stay.

IMPORTANT: The current cycle setting is automatically adjusted by the system.
When a new recurring charge is set up, the initial charge is created and the Current Cycle is set. From this point, the system increases the cycle as charges are created and decreases the cycle as charges are deleted. The Current Cycle setting is no longer manually adjustable to protect the functional integrity of a recurring charge's setup and accounting data like journal entries.
For more information on editing an existing recurring charge, see the Edit Charge section.
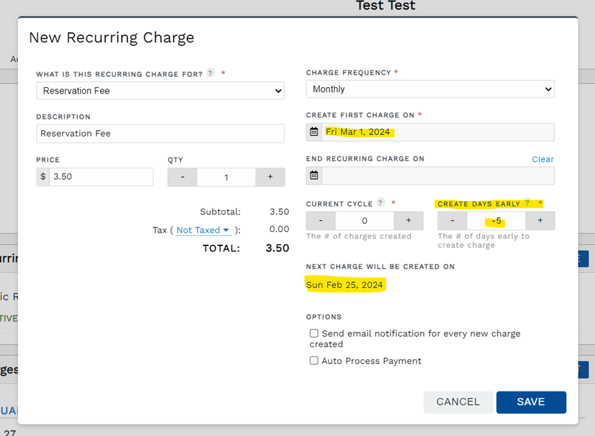
9. Set “Create Days Early”, if applicable.
If you would like the charge to be available before the due date, you can set the charge to create in advance. In the example below, we see a Create Days Early setup for 5 days which will create this March 1st charge on February 25th. This is especially useful for guests that prefer to pay their recurring charge before the due date or on a specific date every month.
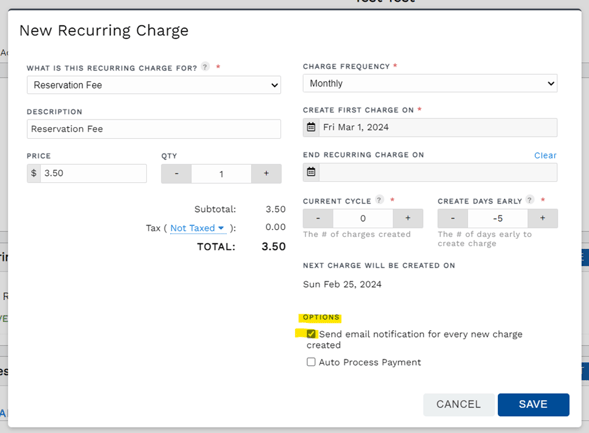
10. Email notification option.
When “Send email notification for every new charge created” is enabled, the guest will receive an email notification when each new charge is created. This is especially useful if they do not have autopayments enabled, so the guest can be notified that they have a new charge and balance available.
11. Automatic payment options.
You may set up a recurring charge to automatically create scheduled payments when a new recurring charge is created. This feature is available when the guest has a payment method on file (credit card or ACH).
Once you select the Auto Process Payment option, you will see two additional option settings:
- Send email notification of upcoming payment and process payment in X days
- Process payment on specific day: X

Select “Auto Process Payment” once you confirm the guest would like to automatically schedule a payment to the payment method on file when a new recurring charge is created. Unless set for a specific day, in the option below, autopayments process the day a recurring charge is created.
Select “Send email notification of upcoming payment…” if you would like to send the guest an email to remind them of their upcoming autopayment. In the example below, an email will be sent to the guest 2 days before the payment will process. This means once a recurring charge posts an automatic payment is scheduled but delayed for the number of days set in the email notification. Setting notification for 1 day will delay payment for 1 day, 3 days notification will delay payment for 3 days, and so on.
NOTE: If you wish to send an email notification for upcoming payments and do not want to delay payments, the charge must be created early. The Create Days Early settings must be equal to or greater than the upcoming payment notification.
For example, if a payment should process on the recurring date, a charge must be created 2 days early to send the email notification 2 days before the payment. If the charge is not created early, the payment will occur 2 days after the charge is created.
For more information about creating a charge early, see step 9 above. For a deeper explanation, see Create a New Charge Early With Auto-Payment Notifications Enabled.
Select “Process payment on a specific day” if the guest would like their payment to be a date other than the recurring date. You or guest may choose a specific day of the month after the recurring date. In the example below, the guest’s payment will process on the 1st of the month even though the charge will be created on the 25th. Leave this box unchecked if the recurring charge is a daily or weekly frequency.
CAUTION: The option to "Process payment on a specific day" will always be on or after the current month's recurring charge date. For example, if the recurring charge date is April 5th and you set the payment day for the 1st, the payment will process on May 1st. It will not process on April 1st because this is before April's recurring charge automations.
You can now SAVE THE CHARGE.🎉 The recurring charge's setup is complete.
You will now see two sections on the reservation's Charges tab: Recurring Charges and Charges. The Recurring Charges section shows the setup of recurring charges. The Charges section displays created charges. As shown in the example below, the system automatically creates the initial charge when a new recurring charge setup is saved.

TIP: A recurring charge's setup displays the next charge date on or after the start date.
Edit a Recurring Charge
All recurring charges are seen in the Recurring Charges section on a reservation's Charges tab. You find this section directly below the summary box and above the Charges section.

If you are not seeing expected charges, ended recurring charges are hidden by default. This reduces the visual clutter users may find confusing or overwhelming. To see all recurring charges, click "Show Ended Recurring Charges".
You may edit the settings of an existing recurring charge at any time. On the recurring charge's setup, click the circle with 3 dots then select Edit.

The Edit Charge pop-up opens displaying the recurring charge's setup. The settings to edit a recurring charge are the same as creating the recurring charge. To make an edit, you simply adjust a setting as needed and click Save when you are finished with all adjustments.
TIP: For more information about a specific setting, the Quick Links above can be used to go to a specific section.
The following are examples of common edits to recurring charges:
Change The Next Charge Date
To change a recurring charge's next charge date, change the "Create first charge on" setting. The charge's starting date works with the current cycle to determine the next charge date. This example shows a next charge date of July 1 driven by charge beginning on May 1 with a Current Cycle of 2.

If the next charge date needs to be one month sooner, on June 1, set the "Create First Charge On" setting for April 1.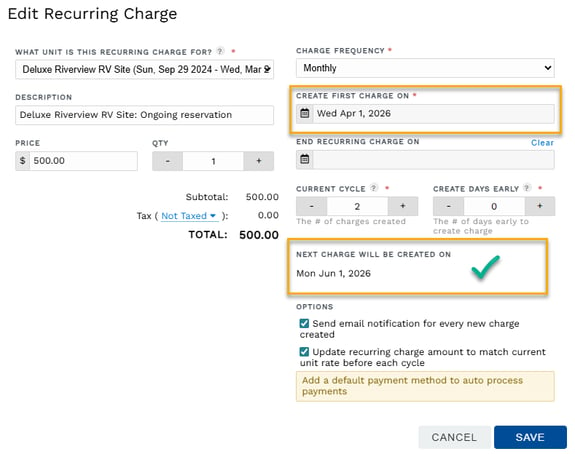
To make the next charge date needs to be one month later, on August 1, set the "Create First Charge On" setting for June 1.
End an Existing Recurring Charge
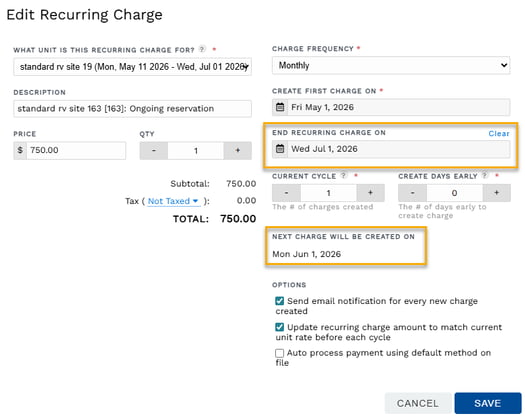
To end a recurring charge regardless of remaining cycles, change the end date to a day before the next charge date. The system to recognize the new end date and fulfill the remaining cycles. This ensures no future charges will be posted, as long as no created charges are deleted.
In this example's first image, we see the existing recurring charge has an end date of July 1 and a next charge date of June 1.
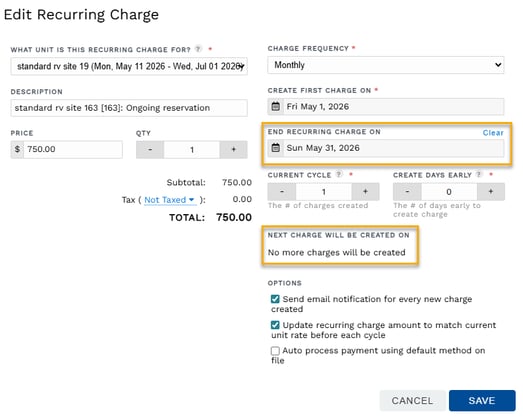
In this second image, we see how changing the end date to May 31, one day before the current end date, will fulfill the cycles and no future charges will be created.
Delete a Recurring Charge
There are times when you may want to delete a recurring charge's setup and times when you only wish to delete a recurring charge's created charge. The process for each these actions is a bit different so the details for each are provided below:
Delete a Recurring Charge Setup
To maintain accurate accounting records, deleting a recurring charge's setup will simply disable it.
To delete/disable a recurring charge setup:
-
On a reservation's details page, go to the Charges tab and find the undesired recurring charge.
-
Click the charge's circle with 3 dots then select Delete.
Deleting a setup automatically changes the status to Ended and hides the setup from the list of Active recurring charges. You may always view ended setups using the blue link to "Show Ended Recurring Charges".
You may even edit an ended charge to restore it, although we only recommend this if picking up right where the charges stopped. If wanting to change
Delete a Created Recurring Charge
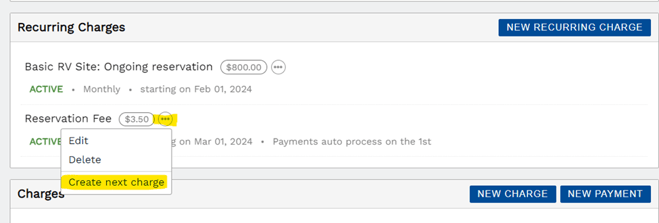
Manually “Create next charge”
When a guest would like to pay a charge early but the charge is not appearing on the reservation's Charges tab, you can manually create the next charge. This may be done on as as-needed basis for one charge at a time or may be repeated in the same use session to post several future charges at once. Posting several charges at once may be helpful for a guest to see upcoming due dates or future payment arrangements.
To manually create a recurring charge's next charge:
-
Go to the reservation's Charges tab and find the Recurring Charges section. It is just below the Summary box at the very top of the page.
-
Click the recurring charge's 3 dots then select Create next charge.