Upload your map to the interactive map builder to link units to a map for guests to book from.
Last Updated: May 29, 2025
Link to Feature: https://app.fireflyreservations.com/maps (or click here)
Quick Links:
Overview
Interactive maps make it easy for potential guests to see available units at your property. By looking at the map, guests can quickly identify an available unit at a location they are interested in and select the unit to book it immediately.
Setting up your interactive map is as easy as uploading a map file and linking units. This short video walks you through the process and written directions are also provided below.
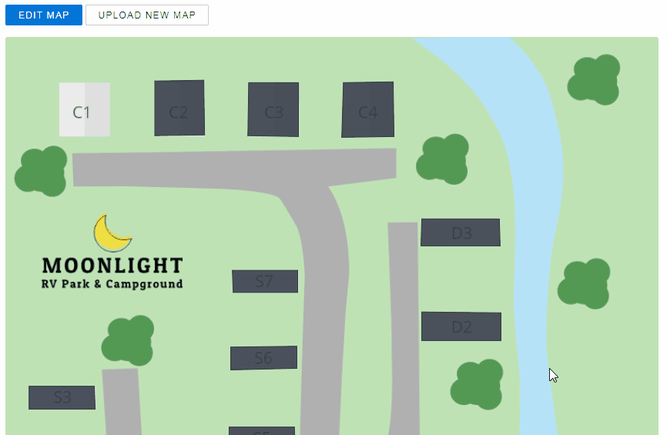
Upload a Map Image
It only takes seconds to upload a map. You have a few format options to choose from and can upload as many maps as your park needs.2
NOTE: The file types that can be uploaded are: .jpg, png, gif
To upload a map:
- Click the Settings dropdown from the main menu
- Select Maps
- Click New Map

- Enter a Map Title
- Click Upload New Map

- A box will then appear prompting you to upload the file from your device. You can click on the file or drag and drop it into the box.

NOTE: If using multiple maps, arrange them in the order they should appear in the dropdown list. The map at the top is the default displayed until a different map is selected from the dropdown.
Link Units to the Map
You need to link the units on your uploaded map. This tells Firefly where each unit is at, so guests can see live availability from the reservation portal just by looking at the map.
To start, click the map to open it. Select Mark Units On Map. Select the type of shape you need to create, a circle or an outline.
- To create a circle... select the Circle option. Choose the diameter of your circle. Place the crosshair cursor over the center of the site and click. Select the site number you are linking and click Save. Repeat for other sites with a circle shape on the map.
- To create an outline... select the Outline option. Click on each corner of a unit, ending on the first corner you started with. When the shape is complete, a dialog will show so you can select the unit you just outlined. Select the unit, and click Save. You can drag any corner to adjust the shape you just created over the unit. Repeat this step for each one of your units.
- To remove a unit... click Finish Marking Units. Click a unit, and select Remove from map to unlink the unit. This does not effect the unit in any way other than removing the shape from the map.
- This process is the same if you need to move a link's location or change it's shape/size. To redo the unit link, simple repeat a process above to add the correct location or shape.
- This process is the same if you need to move a link's location or change it's shape/size. To redo the unit link, simple repeat a process above to add the correct location or shape.
When all done linking sites, click Finish Marking Units.
WARNING: A unit can only be linked to one map at a time. You will not see a unit in the dropdown list if it is already linked to map. In this case, you must first unlink the unit from it's current map before you are able to link it to a new map.
Booking from a Map
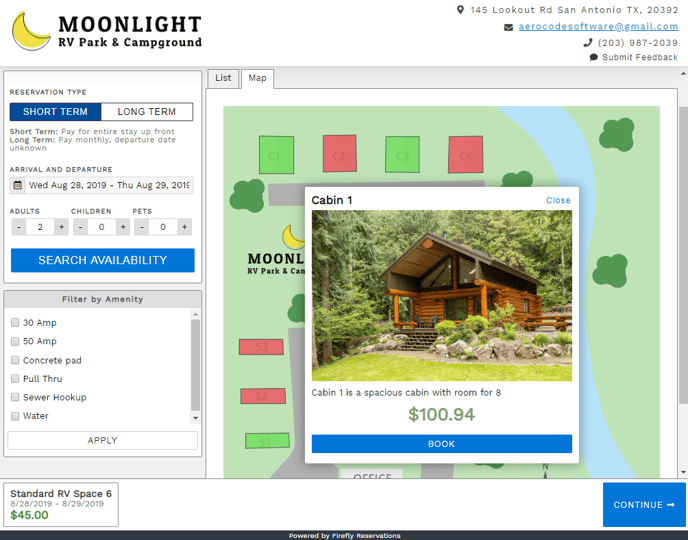
Now that your map has been set up, reservations can be booked from the map. Staff using the Front Desk and guests booking on your reservation portal, will now have the option to see available units in a List view or Map view.
Search for available units by entering any search parameters. Select the Map tab, and you will see the interactive map with each available unit in green and unavailable unit in red.
Click any unit to view more info about that unit, and click Book to add that unit to your card. You can switch back to list view at any time by clicking the List tab.
Additional Tips
- To make a map, you can use a simple image editor such as Microsoft Paint or a vector editor like InkScape, Illustrator, or Gravit Designer which was used to make the map above. You can also choose to simply upload an overhead satellite image from Google Maps.
- Check out this article for creation and editing options: Map Creation Services and Options
- To print a copy of a map uploaded in Firefly follow these steps:
- Go to Settings > Maps > click on a map to open it.
- Right-click anywhere on the map image and select Open image in new tab

- When the image opens, press Ctrl + P to open the print dialogue box or right-click on the image and select Print
- To save a copy of a map uploaded in Firefly follow these steps:
- Go to Settings > Maps > click on a map to open it.
- Right-click anywhere on the map image and select Save image as.

🙋♀️ Still need help? Email: support@fireflyreservations.com and one of our technicians can help answer your questions.
💭 We would love to know if this article was helpful in addressing your issue. If you could answer the question below it will notify our team. Thank you!