Last Updated: February 16, 2026
Link to Feature: https://app.fireflyreservations.com/reservationgrid (or click here)
IMPORTANT: The Expanded grid is the system default. The Classic grid was retired and removed from the system on February 2, 2026.
Quick Links
Overview
The reservation grid offers a simple way to quickly get a glance at your reservations and their essential details. You can quickly see what units will be filled on a specific date, what units are filled with long term reservations, which reservations have overdue charges, and even what guests have a payment record on file.
Grid Access
The grid is accessible from the main menu as well as hot buttons that provide one-click access.
On the main menu, click the Reservations dropdown then select Reservation Grid. 
For a quick shortcut, you may use the Dashboard's Reservation Grid quick link or the "waffle" icon that remains at the top of every page in Firefly.
Basic Reservation Grid Features
Default Grid Display
The Reservation Grid has a default display that shares essential, basic information about your property's units and reservations. If you do not set up any customizations, below is a sample of what your grid will look like by default.

The display control bar is frozen to the top of the screen so it always remains in view as you scroll.
TIP: We highly encourage you to not hesitate to customize your grid. Try out the features in this and the next section, knowing you can continue to tweak your processes and settings until they are just right for you and your property. The grid is a powerful tool to help you optimize your reservations and staff efficiency!
Display Filters
The very top row on the reservation grid is your control bar containing display filters. These filters allow you to adjust your grid view to focus on specific dates or units.

Moving through the control bar, left to right, you encounter these display filters:
- Month or Year: toggle to condense or expand the calendar view with one click.

- Date Range: the default display is one month or one year from today's date. You may customize this range by clicking on the calendar icon or the displayed dates to its right.

- The reverse or forward arrow on either side of the date range adjusts the display 60 days in the selected direction.
- Click
 to reset the grid view to show one month or one year from today's date.
 - This custom date range will be remembered every time you return to the grid.
- Refresh: click the refresh symbol (
 ) to see reservation or availability changes.
- Guest Name Search: enter a specific guest name to highlight reservations with a match, reservations that do not match with display in light gray.

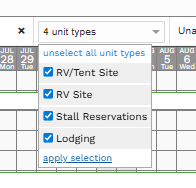
- Unit Types: filters units by lodging, RV sites, boat slips, etc.

- Unit Class: restricts the display to see units only from the selected class(es)

- Equipment Type: will only show units that accept the specified equipment

- Amenity: displays all units with the selected amenity feature(s)

- Duration Type: filters units by Nightly or Day Use designation

Filters with a dropdown may include multiple items. You may select as many or as few as desired. Simply check or uncheck boxes then click "apply selection" at the bottom.
 Display filters remain in place until changed. This can be surprising when units you expect to see are not appearing. To return the grid to its full view, adjust each filter to include all units.

Understand Unit Icons & Reservation Details
The following are symbols you may see associated with a unit to give you at-a-glance information about the unit's settings.
Reservation Types Accepted
To the left of the unit name, an icon indicates which types of reservations the unit is set to accept:
-
 indicates all types accepted
 -
 indicates only ongoing reservations are accepted
 -
 indicates only standard reservations are accepted
Reservation Duration Type
To the left of the unit name, an icon indicates which types of reservations the unit is set to accept:
-
 indicates the unit currently books Nightly reservations.
 -
 indicates the unit currently books Day Use reservations.
Unit Hidden from Reservation Portal
Also on the left of the unit name, the ![]() indicates a unit is hidden from the reservation portal.
indicates a unit is hidden from the reservation portal.
No Daily Rate Warning
If the unit does not have a daily rate for the next 365 days, you will see ![]() . The unit is still bookable if any date in the reservation has a rate. However, pay careful attention to this warning as dates without rates will not be charged. You may hover over the symbol to see the dates without rates. To set rates, see: Unit Rates - Setup and Changes.
. The unit is still bookable if any date in the reservation has a rate. However, pay careful attention to this warning as dates without rates will not be charged. You may hover over the symbol to see the dates without rates. To set rates, see: Unit Rates - Setup and Changes.

Reservation Details
Hover over a reservation to see all the most essential details. Guest name, arrival and departure dates, number of nights in the stay, total reservation cost, check in status, if they have a payment method on file, if they have overdue payments, the source of the reservation and the status of their policies can all be seen from this pop-up box.
You may even click on the reservation to go the reservation detail page, where you can further confirm or make necessary changes to the reservation info, charges, payments, etc.
TIP: The icons seen in the reservation block above are a customization option you may choose to enable. For more information or to set these up, see: Reservation Icon Options.
Grid Customization Options
The expanded grid offers many opportunities to customize the look and information you see at-a-glance. You may choose to edit the cell size, display of unit size limits, color coding for reservation blocks, and icons for reservation details.
A specific permission is dedicated to grid settings, so be sure you have Reservation Grid Settings Management enabled in your user permissions before proceeding.
IMPORTANT: "Reservation Grid Settings Management" permission is required to access the grid's settings and complete any of the steps below.

If you click the grid's Gear icon and nothing happens, your permission is disabled.

For more information, see: Update User Permissions.
Cell Size, Font Size, and RV Size Limitations
- Go to your grid using this Reservation Grid hyperlink or the instructions from the Grid Access section above.
- Click the Settings icon, which looks like a "gear", in the top right corner of the page.

Show RV Size Limitations
The first setting you encounter is an option to display your unit's RV size limitations.
Enabling this option displays a column titled "Size Limit" to the right of each unit name. In the column, you will see the word Max followed by the maximum RV length allowed - listed in feet. You then see a vertical line before a single letter representing the slide out allowance.
Slide out allowances display as follows:
-
D: Driver Side Only
-
P: Passenger Side Only
-
O: One Side Only
-
B: Both Sides
-
N: No Slides
-
Lack of a letter representing a slide out allowance means the unit type excludes slide outs.

You may hover over the column to see a more detailed view about each size limit.
The information displayed in the Size Limit column is managed in a unit's settings.
Adjust Row height, Column Width, or Font Size
For viewing comfort or to accommodate your device's display, you may adjust the cell or font size. To match the look of the Classic Grid, set Unit/Row Height and Column Width to 25.

Be sure to click Save to apply your changes!
Reservation Color Options: Background and Border Color Sources
You can display colors showing a reservation's status for check in, reservation type, balance due, or reservation duration (Nightly or Day Use). You get the option to set one of the above details as a background color on the reservation blocks or a colored line at the top border of the reservation blocks. Enabling both the background color and border color allows you to track the two key details most essential to your park's daily operation.
To set up your expanded grid color options:
- Go to your Reservation Grid
- Click on the Settings Gear in the top right corner
- Confirm that the "Expanded Grid" has been chosen
- Click on the Reservations Tab

NOTE: By default, both the Background Color Source and Border Color Source options are disabled. Without customization, or to return your settings to default, these will be set to None.

Background Color Source The background color is the fully shaded color of the reservation block. These may be set to show the status of check in, reservation type, balance due, or duration type (Nightly or Day Use).

- Check In Status
Not Checked In = Red
Checked In = Green
Checked Out = Gray
No Show = Orange - Reservation Type
Standard = Blue
Ongoing = Green - Balance Due Status
Unpaid = Gray
Paid = Green
Partially Paid = Yellow
Overdue = Red
Overpaid = Red
Border Color Source: The border color is a colored bar along the top of each reservation block. Notice the red and green thin lines at the top of the reservations shown below. Border colors may be set to show the status of check in, reservation type, or balance due.
Notice the border colors of red and green at the top of the reservation blocks.
- Check In Status
Not Checked In = Red
Checked In = Green
Checked Out = Gray
No Show = Orange - Reservation Type
Standard = Blue
Ongoing = Green - Balance Due Status
Unpaid = Gray
Paid = Green
Partially Paid = Yellow
Overdue = Red
Overpaid = Red
Reservation Icon Options
Various icons can be enabled to help your staff quickly identify information about a reservation without having to click into the reservation. You can choose to display all available icons to see the most information at a glance or keep things simpler with just the ones that are most important to you.
Here are the icon symbols available and the description of what they represent:

NOTE: By default, all icons are disabled. Items under Available Icons are disabled and anything under Selected Icons are enabled to display on your grid.
To add icons to your expanded grid view:
- Go to the Reservation Grid
- Click on the Settings gear in the top right corner
- Click the Reservation tab
- Under the Icons section, you will see Available Icons. Hover over an icon to see the Add button. Click Add to enable the icon.
- Once all desired icons are enabled, click Save

That's it! Your expanded grid is now fully customized.
TIP: As you settle in to your customized grid or your business grows, come back and adjust your grid settings any time to optimize your viewing comfort and most efficient productivity.
Advanced Reservation Grid Features
From the grid, you can also complete reservation management activities like creating a reservation, blocking a unit, and checking a reservation in or out. We have an entire article dedicated to these advanced features. For walkthroughs to optimize your grid use, check out: Advanced Reservation Grid Features. 
🙋♀️ Still need help? Email: support@fireflyreservations.com and one of our technicians can help answer your questions.
💭 We would love to know if this article was helpful in addressing your issue. If you could answer the question below it will notify our team. Thank you!