The Reservation Grid is where you can find a calendar view of all your reservations for a specific time or filtered criteria. This article covers use of the grid as well as managing settings.
Last Updated: December 1, 2025
Link to Feature: https://app.fireflyreservations.com/reservationgrid (or click here)
IMPORTANT: Classic grid will be removed from the system on February 1, 2026.
Classic Grid is the current default but all updates or enhancements to the grid will take place on the Expanded Grid.
We encourage all parks to adopt use of the Expanded Grid as soon as possible.
Quick Links
Overview
The reservation grid offers a simple way to quickly get a glance at your reservations. Quickly see what units will be filled on a specific date, what units are filled with long term reservations, which reservations have overdue charges, and even what guests have a payment record on file.
Firefly Reservations has two types of grid options:
- Classic Grid
- Expanded Grid
Grid Access
On the main menu, click the Reservations dropdown then select Reservation Grid. 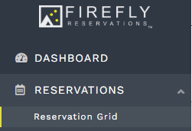
For a quick shortcut, you may also use the Dashboard's Reservation Grid quick link or the "waffle" icon that remains at the top of every page in Firefly.
Continue through the remainder of the article to learn more about using the reservation grid.
Grid Selection
The Classic Grid is the default for all parks. With this feature retiring on February 1, 2026, we encourage you to switch to the Expanded Grid as soon as possible.
You manage your grid type and grid display options right from the grid. Look for the Settings icon, displayed as a gear, in the upper right corner. You will find it just below the bell and megaphone.
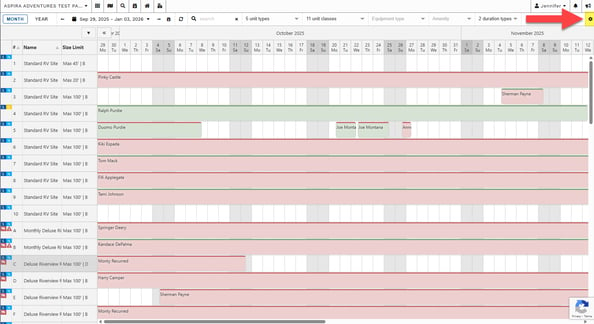
As you can throughout Firefly, hover over the icon to see the name of the associated feature. 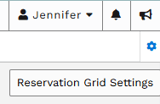
Click on the "gear" icon to be taken to the Grid Display Options page, where you can confirm or manage your grid type. After making a change, be sure to click Save at the bottom of the page.
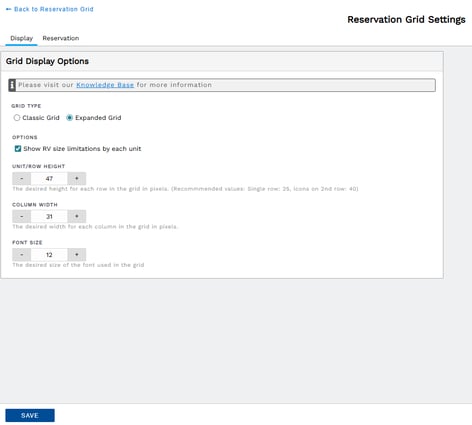
You may stop here to use a grid's default settings, or continue through the remainder of the article to learn more about each option in your Reservation Grid Settings.
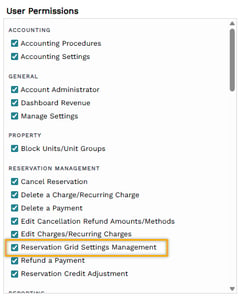
NOTE: If you click on the "gear" icon to edit your grid settings and nothing happens, your permission is not enabled.
All users must enable the "Reservation Grid Settings Management" permission to gain access to grid settings. For more information, see: Update User Permissions.![]()
Classic Grid
The classic grid (the default grid view for parks) is the original grid with helpful information for all Firefly users. It is not customizable, but it still offers a great calendar-style view of reservations in the park.
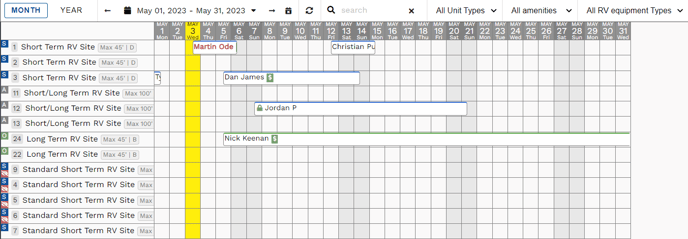
Display Options and Filters (left to right)
The display control bar is frozen to the top of the screen so it remains in view as you scroll.
- Toggle between Month or Year to condense or expand the view with one click.
- Customize the display date range from a calendar by clicking on the calendar icon or displayed dates. The reverse or forward arrow on either side of the date range adjusts the display 60 days in the selected direction. This range will be remembered every time you go back to the grid.
- Clicking
 will reset the grid view to one month or one year from today's date.
 - The
 symbol will refresh the grid to show any new changes or reservations while still in the grid view
 - Search for a specific reservation by guest name. Typing in a name will highlight one(s) that match and grey ones that do not match.
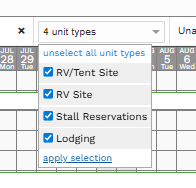
- Unit Types filters units by lodging, RV sites, boat slips, etc.
- Unit Class restricts the display to see units only from the selected class(es)
- Equipment Type will only show units that accept the specified equipment
- Amenity displays all units with the chosen feature(s)
NOTE: When using filters to adjust the viewable units on the grid, be sure to click "apply selection" at the bottom of the dropdown.
Understand the Symbols
Reservation Types Accepted
To the left of the unit name, a small icon indicates which types of reservations are accepted at that unit (Standard or Ongoing). ![]() indicates all types accepted,
indicates all types accepted, ![]() indicates only ongoing reservations are accepted, and
indicates only ongoing reservations are accepted, and ![]() indicates only standard reservations are accepted.
indicates only standard reservations are accepted.
Unit Hidden from Reservation Portal
![]() indicates that a unit has been hidden from the online reservation portal. This can be toggled within the unit settings.
indicates that a unit has been hidden from the online reservation portal. This can be toggled within the unit settings.
Show RV Equipment Restrictions
To the right of each unit, you have the option to show the RV Size and Slide out Restrictions for that particular unit. It will be displayed as Max RV Size | Slide out Type Accepted. If you hover over the box you will get a more detailed view. To enable this go to Settings > Property > Display Preferences > Scroll down to Reservation Grid > Select "Show RV Size Limitations"
Reservation Type
The type of reservation can quickly be determined by the color of the reservation. Reservations with a green border on top are ongoing reservations, while a blue border indicates a standard reservation.
Overdue Charges
If the guest's name is red, this indicates a charge has not been paid and is now overdue. If their name is black, they do not have any unpaid charges, or they may have an unpaid charge that is not yet overdue. This is especially handy because you can take one look at the grid to see what reservations need attention to make sure all payments are collected.
Payment Method on File
If the reservation has a green square with a white dollar sign ![]() , this indicates that reservation has a payment method on file. Those that do not have this icon, do not have payment methods on file.
, this indicates that reservation has a payment method on file. Those that do not have this icon, do not have payment methods on file.
Locked Site
If a reservation has a green lock symbol ![]() , this indicates that the guest has purchased or you have added a site lock to this reservation.
, this indicates that the guest has purchased or you have added a site lock to this reservation.
Reservation Details
Hover over a reservation to get more information on that reservation. Guest name, number of nights in their stay, if they have a payment method on file, if they have overdue payments, arrival and departure dates, and reservation total can all be seen from this pop-up box. Click on the reservation to go the the reservation detail page where you can manage the reservation and see all reservation info, charges, payments, etc.
Expanded Grid
Expanded grid provides all the same features as classic grid with the added bonus of at-a-glance visual cues. Expanded grid adds colors showing a reservation's status for check in, reservation type, balance due, or reservation duration (Nightly or Day Use). You get the option to set one of the above reservation details as a background color on the reservation blocks or a colored line at the top border on the reservation blocks. Enabling both options helps you track the two key details most essential to your park's daily operation.
This enhanced grid also allows you to select icons for display inside the reservation blocks, customize the grid's cell height and width, as well as a custom font size. All this to help you display the grid most comfortably for you and your device.
NOTE: A user must have this permission enabled to access grid setup shown below: Reservation Grid Settings Management
Switch to the Expanded Grid
To switch to the expanded grid:
- Go to your grid using this Reservation Grid hyperlink or the instructions from the Grid Access section above.
- Click the Settings icon, which looks like a "gear", in the top right corner of the page.

- Choose Expanded Grid

- Enable RV size limitations if desired. Adjust row height, column width, or font size for viewing comfort or to accommodate your device's display.
To match the look of the Classic Grid, set Unit/Row Height and Column Width to 25.
- Click Save
NOTE: If you click on the "gear" icon to edit your grid settings and nothing happens, your permission is not enabled.
All users must enable the "Reservation Grid Settings Management" permission to gain access to grid settings. For more information, see: Update User Permissions.![]()
Expanded Grid Default Display
If you do not set up any specific color or icon options for your grid, below is a sample of what your expanded grid will look like by default when enabled.
You may customize your Expanded Grid to optimize reservation tracking and staff efficiency. These next sections share more about customizing the look and information you can receive on the Expanded Grid.
Reservation Color Options: Background and Border Color Sources
To set up your expanded grid color options:
- Go to your Reservation Grid
- Click on the Settings Gear in the top right corner
- Confirm that the "Expanded Grid" has been chosen
- Click on the Reservations Tab

NOTE: By default, both the Background Color Source and Border Color Source options are disabled - set to None.

Background Color Source The background color is the fully shaded color of the reservation block. These may be set to show the status of check in, reservation type, balance due, or duration type (Nightly or Day Use).

- Check In Status
Not Checked In = Red
Checked In = Green
Checked Out = Gray
No Show = Orange - Reservation Type
Standard = Blue
Ongoing = Green - Balance Due Status
Unpaid = Gray
Paid = Green
Partially Paid = Yellow
Overdue = Red
Overpaid = Red
Border Color Source: The border color is a colored bar along the top of each reservation block. Notice the red and green thin lines at the top of the reservations shown below. Border colors may be set to show the status of check in, reservation type, or balance due.
 Notice the border colors of red and green at the top of the reservation blocks.
- Check In Status
Not Checked In = Red
Checked In = Green
Checked Out = Gray
No Show = Orange - Reservation Type
Standard = Blue
Ongoing = Green - Balance Due Status
Unpaid = Gray
Paid = Green
Partially Paid = Yellow
Overdue = Red
Overpaid = Red
Reservation Icon Options
Various icons can be enabled to help your staff quickly identify information about a reservation without having to click into the reservation. You can choose to display all available icons to see the most information at a glance or keep things simpler with just the ones that are most important to you.
Here are the icon symbols available and the description of what they represent:

NOTE: By default, all icons are disabled. Items under Available Icons are disabled and anything under Selected Icons are enabled to display on your grid.
To add icons to your expanded grid view:
- Go to the Reservation Grid
- Click on the Settings gear in the top right corner
- Click the Reservation tab
- Under the Icons section, you will see Available Icons. Hover over an icon to see the Add button. Click Add to enable the icon.
- Once all desired icons are enabled, click Save

That's it! Your expanded grid is now fully customized.
TIP: As you settle in to your customized grid or your business grows, come back and adjust your grid settings any time to optimize your viewing comfort and most efficient productivity.
🙋♀️ Still need help? Email: support@fireflyreservations.com and one of our technicians can help answer your questions.
💭 We would love to know if this article was helpful in addressing your issue. If you could answer the question below it will notify our team. Thank you!
