Quick Links:
Purchase a Terminal Through Stripe
Take a Payment Using a Stripe Terminal
As of Summer 2024, Stripe is only available to customers already integrated with Stripe in Firefly. While we will continue to support our customers using Stripe, it is no longer our recommended payment processor. Visit this link for our most up to date information on payment processors.
Overview
Firefly is integrated with Stripe, so if Stripe is your payment processor you can use their terminals to process payments. To buy a terminal integrated with Firefly, you will need to purchase it through your Stripe Dashboard.
Purchase a Terminal through Stripe
NOTE: We have noticed that Stripe regularly changes their dashboard. If the screenshots below no longer match what you see, feel free to reach out and let us know! We do our best to keep these knowledge base articles as up to date as possible.

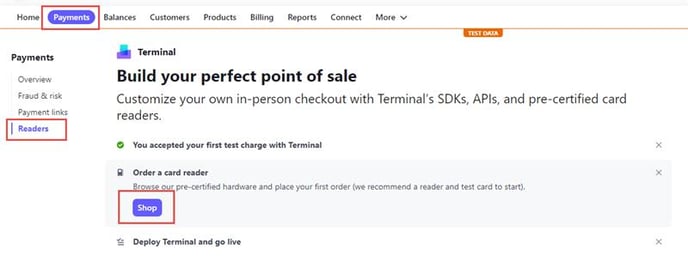
- Click on Terminal Readers

- Click Shop

- Click "I want to integrate using Stripe APIs"

- Click "Continue to Shop"

- Choose the device

- Click "Add to Cart"

NOTE: The only terminal currently compatible with Firefly is BBPOS WisePOS E. If Stripe more readers become compatible, we will add for them as soon as possible.
Set Up Your Stripe Terminal
Once you receive your terminal, plug it in to power and connect it to your network either through Wi-Fi or the ethernet port on the terminal.
Log in to your Stripe dashboard, and click Readers from the main menu. From there, scroll down to the Locations section, and click + New.

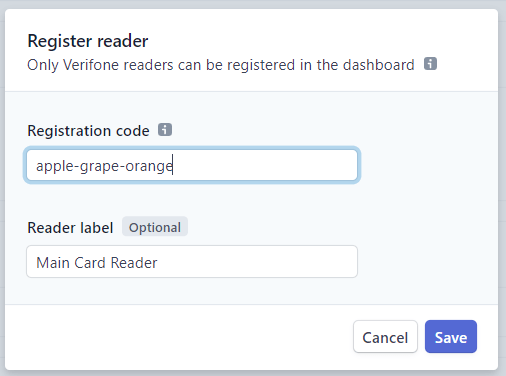
Enter a name for the location of this terminal . This can just be your campground name or whatever you would like. Once you have added the location, select that location to open that location. In the Readers section, click + Register.

First you will need to enter the Registration code. In order to find your registration code, enter 07139 on your terminal . This will show you a code with 3 random words, such as "apple-grape-orange". Enter your unique 3 word code into the registration code box. You can also give this reader a name if you would like.

Once you click Save, you will be ready to use your terminal as long as your terminal is connected to your network.
NOTE: If you encounter any difficulties connecting your terminal to Firefly after completing the steps outlined above, we recommend contacting Stripe for additional assistance. You can find the contact information in the "Contact Stripe Customer Support" section for your convenience.
Take a Payment Using a Stripe Card Terminal
You can use the card terminal on the POS Register and when collecting a payment for a reservation.
POS Register Payments
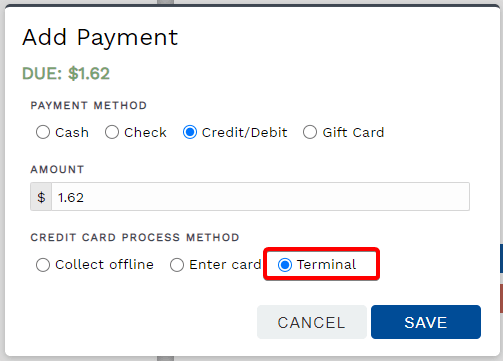
On the POS Register, when you are adding a payment, you will see a Terminal option if you have chosen "Credit/Debit" as the payment method, and if the card terminal is detected on your network. Note, the card terminal and the computer you are on must both be connected to the same network in order for the terminal option to appear.

When you click Save, the terminal screen will display the payment amount, and the customer can swipe, tap, or enter their card. Once the card has been successfully read, the Add Payment dialog will close and you will see the payment listed under Payments.
Reservation Payments
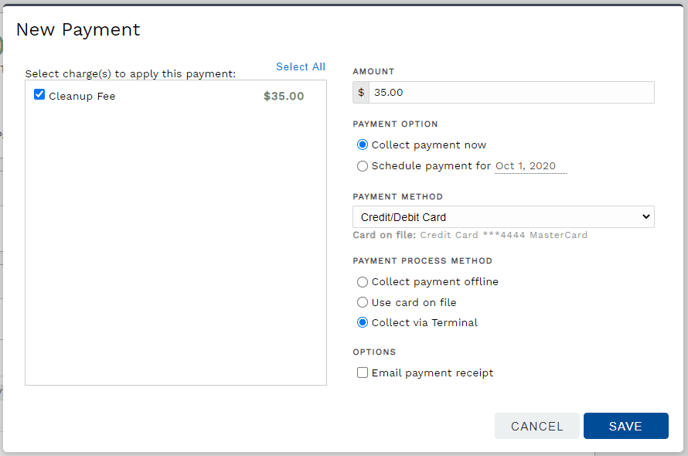
To collect a credit card payment using the card terminal for regular reservation payments, select the Collect via Terminal option when you have selected Credit/Debit Card as the payment method.
 Use the terminal to collect reservation payments
When you click Save, the terminal screen will display the payment amount and the customer can swipe, tap, or insert their card.
The customer may also X out or cancel the transaction to abort it. If the transaction is ended by the guest through the terminal, the payment process will need to be started again if desired.
Once the card has been successfully read, the New Payment dialog will close and you will see the payment listed under that charge. If the payment fails and you would like more information about the failure, you may connect with your payment processor.
You MUST CLICK SAVE to initiate the payment process and trigger your terminal.
Terminal Troubleshooting
If your terminal is not appearing as an option when making a payment, try these troubleshooting steps. You may work progressively through the list, attempting a payment after each recommendation, or you may complete the list then reattempt.
- Check for updates on your internet browser and terminal.
- Clear browser storage - cookies and cache.
-
Restart the terminal and the device accessing Firefly.
-
paste this logout link into your browser before restarting your Firefly accessing device: app.fireflyreservations.com/Account/Logout?&
-
- Ensure the terminal and Firefly accessing device are on the exact same network
- Make sure your terminal is online and ready to process payments
TIP: Stripe Support is your go-to for assistance with your terminal. This includes updates, restarts, connecting to your network, and terminal payment processing.
Wrap Up
That is all! The Stripe terminal is a quick and easy way to start saving time and money when collecting payments via Credit card in your office. The ordering and setup process only take a few minutes, so it really only requires the up front investment of purchasing the card terminal in order for you to start saving money.
🙋♀️ Still need help? Email: support@fireflyreservations.com and one of our technicians can help answer your questions.
💭 We would love to know if this article was helpful in addressing your issue. If you could answer the question below it will notify our team. Thank you!
