This article highlights the various payment processing partners integrated with Firefly, and provides help setting up your chosen processor.
Updated: January 23, 2025
Link to Firefly Feature: Settings > Property > Payments & Charges (or click here)
Quick Links to Processor Help Articles:


PLEASE NOTE: Stripe and Payroc (BridgePay/i3) are grandfathered processors.
Quick Links:
Which payment processor is right for you?


Which Payment Processor is Right For You?

Payment Processor Options
Being able to process credit cards online so you can capture payments at the time a customer is willing to pay. Firefly allows you to collect a deposit amount of your choosing at the time the guest makes a reservation.
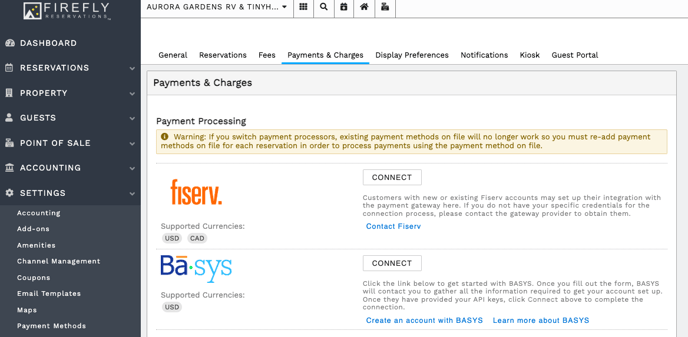
For new customers, Firefly offers two payment processing integrations. Two recommended processors: BASYS and Fiserv.
What is the difference between the two payment processing companies?
- Fiserv is one of our preferred payment processor partnership. Our customers get excellent rates, and a quick business approval process, fast funding, and 24/7 support.
- BASYS is one of our preferred payment processor partnerships. They offer competitive rates and quick setups. They have very good personal support and account management.
If you have created your account with BASYS or Fiserv and are ready to connect within Firefly, go to Settings > Property > Payments & Charges tab, here.
Fiserv Set Up Instructions
Click here learn more about Firefly and Fiserv's partnership.
Getting Started with Fiserv
From inside Firefly
- Click "Settings"
- Click "Property"
- Click on the "Payments and Charges" tab
- Scroll to the Clover Connect option, and click "Contact Fiserv"

Setting Up Fiserv
Once you are a confirmed Fiserv customer, you will have the information you need to update Firefly and start taking online transactions.
- Click Settings
- Click Property
- Click the Payments and Charges tab
- Next to Fiserv, Click Connect
- Enter in the information that Fiserv has provided
- Click Save

Having trouble with your credentials? Here are a couple of tips we received directly from Fiserv:
◽ Check for accidental typos
◽ Instead of copy/paste your credentials from the secure email you received, try manually typing in the information. This can eliminate any hidden characters that were accidentally grabbed in the copy/paste
BASYS Set Up Instructions
BASYS is a partner that will become like trusted family, providing dedicated account management and a caring customer support. They offer competitive rates and quick setups.
Follow this guide to get started processing payments directly in Firefly using BASYS.
Set up a BASYS Account
From inside Firefly, go to Settings > Property and choose the Payments & Charges tab. Click Create an account with BASYS.

Learn more about BASYS - This will bring you to the BASYS partner page. Once submitted the BASYS team will contact you.
Connecting Your BASYS Account
The BASYS team will send you all of your information needed to connect your BASYS account in Firefly. Go to Settings > Property and click the Payments & Charges tab. Now click Connect next to BridgePay.

1. Enter your BASYS credentials for Public Key and Private Key
2. Select your settings for ACH and Requiring credit card billing address
3. Select Test Settings
4. Click Save to save the BASYS connection details and you are complete! You are now ready to process payments in Firefly using BASYS.
BASYS Support
For support needs, visit their support page here.
CAUTION: If considering a change in payment processors, payment methods on file with your existing processor will not transfer to the new processor. All payment methods on file must be removed and added again once connected with the new processor.
Also, payments taken through the previous processor may not be refunded through the new processor. These refunds may only be completed by cash, check, or reservation credit. You may have refund options directly through your previous processor but will have to connect with them to confirm available options.
🙋♀️ Still need help? Email: support@fireflyreservations.com and one of our technicians can help answer your questions.
💭 We would love to know if this article was helpful in addressing your issue. If you could answer the question below it will notify our team. Thank you!