Point of Sale, also known as POS, is an integral part of many outdoor hospitality businesses. Firefly includes a well-rounded feature to meet your POS needs. This article walks you through the setup and use of Firefly's POS feature, while also providing helpful information for daily use.
We recommend using POS Item Categories because they help with navigating the POS Register and offer an efficient way to manage tax and financial settings for items within the category. They also provide more flexibility in reporting for what your customers consume.
To create a category:
Click Settings on the main menu
Click POS Item Categories
Click New Category
Type in a Name and Description
Click Save
Repeat for any additional categories you wish to create at this time.
That's it! Your POS item categories are done! 🎉
When ready, you may add POS items to a category on the item's setup.
TIP: Using POS Item Categories makes it easy to bulk edit taxes or financial accounts for all items in the category.
Add POS Vendors
Keeping track of the point of sale vendors is also helpful information for your park to track.
To add Point of Sale Vendors:
Click Settings on the left menu
Click POS Item Vendors
Click New Vendor
Type in the Vendor Name
Click Save
Add Point of Sale Items
POS Items can be added at any time. You can watch this video to learn the steps, or continue reading below.
Here are the steps to do so:
Click the Point of Sale dropdown on the main menu
Select POS Items
Click New Item
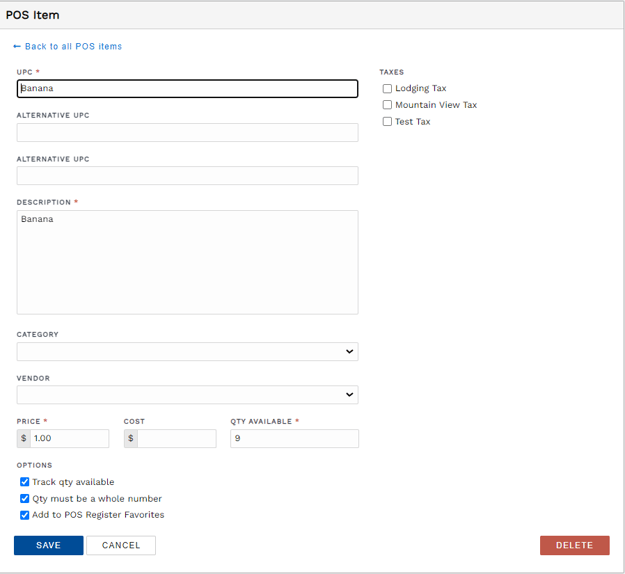
Complete the information needed to click save. Any field with an * means that it is required, others are optional. These can also be changed at a later date.
UPC - If your park does not use codes, this can be the unique name of the item
Alternative UPC (two fields)
Description
Category
Vendor
Price
Cost
QTY Available
Choose the additional options you wish to apply to the item:
Taxes
Track or not track the quantity
Determine that the quantity must be a whole number
Add the item to your POS Register favorites, for quick access to frequently used items
Click Save
Set Point of Sale Favorites
The Favorites list is on the left side of the POS Register display. Any POS item can be designated as a favorite on the item's settings page. You may utilize Favorites for frequently sold items, items without bar codes, or even items you want staff to promote or upsell during checkout.
To access the POS Register, click the Point Of Sale dropdown on the main menu then select POS Register. The POS Register opens with three distinct sections: Favorites list, shopping cart, and transaction summary with management actions.
Favorites -The Favorites section is the fastest way to add items to a transaction.
Shopping cart - This is where you may search items to sale and manage the items selected for this sale.
Summary - The Summary is the list of all of the items in the transaction, as well as the subtotal and total.
Payments - All payment activity for the transaction will show here, including payments and refunds.
By clicking "Add Payment" you can add a payment. Multiple payment method options may be provided depending on your parks set up
When clicking "other options" you will see an option to charge to a reservation, or to a guest
Printer settings - This is where you can find your receipt printer settings.
Complete a Transaction (start a sale through taking a payment)
Start with a Blank Transaction
Navigate to the POS Register by clicking POINT OF SALE>POS Register on your main menu.
Ring Up Items
There are four ways to add items to a POS transaction:
UPC scanner - If your items were set up with a UPC scanner, you can ring up the item by scanning the item barcode with the UPC scanner. Some scanners automatically add each item to the shopping cart while other scanners require you to click in the POS item search bar, scan the item, then select enter to add item to cart.
Type in UPC- If you know the exact UPC of an item, you can type the UPC into the POS item search bar and hit enter on your keyboard or select the green Plus-sign button to instantly add the item to the transaction. If you type a UPC and click the magnifying glass icon, the Item Search pop-up opens that allows you to search your full inventory for the UPC entry.
Item search- Typing a keyword into the POS item search bar allows you to find an item with the item's name or POS Category. Entering your keyword(s) then using your keyboard's Enter key will instantly add the item to the cart if there is a single, exact match. If your entry has no exact match or multiple matches are found, the Item Search pop-up displays so you may continue to search for the desired item. You may also manually open the Item Search pop-up by entering your keyword then selecting the magnifying glass icon instead of hitting enter or clicking the green Plus-sign button.
POS Favorites- Adding a POS item to your Favorites list is a quick and easy way to ring up frequently used items. In the item's setup under POS Items, enable and save the option for POS Register Favorites. When in the POS Register, simply click on an item in the Favorites list to add it to the transaction.
Edit Items as Needed
Simply click an item in the transaction to open it's details. Update the price or change the quantity then click the green checkmark to save. Remove an item by clicking the trash can. More detailed information is available in the section below: Manage Point of Sale Items.
Complete Transaction
IMPORTANT: When a payment is applied to a POS transaction, the cart is locked and no additional POS items can be added. If additional items are desired after taking a payment, you will start a new transaction.
Payment options appear in the transaction summary box on the right side of the POS register as soon as one item is added to the transaction. When you are finished adding items and you are ready to complete the transaction, you have a couple of different options: add a payment, charge to an active reservation, and charge to a guest account. Each option is outlined below.
When all desired items are added, click Cash or Credit/Debit Card for expedited checkout.
POS register payment options with expedited buttons for cash and cards
Clicking the green Cash button, shown above, opens the Add Payment pop-up with a dedicated cash payment menu. This allows you to manually enter the amount of cash received and then click Save, or you may choose a one-click button in the Suggested Amounts section. These one-click cash options are for exact cash or a denomination commonly received for the balance due total.
Cash dedicated payment menu opened with green Cash button
Selecting the blue Credit/Debit Card button, shown above, opens the Add Payment pop-up with Credit/Debit Card already selected as the payment method and the sale amount filled in. To complete the payment, you only need to select the process method and click Save.
Card dedicated payment menu opened with blue Credit/Debit Card button
To go straight to the full payment menu, click the blue Add Payment button.
Add Payment button opens the full menu of payment method options
The Add Payment pop-up appears. This is where you may view all available payment methods set up. To complete a payment, select the guest's desired option so you may confirm the payment amount, add optional notes, and click Save.
Instead of taking a payment, you may charge the transaction for a future payment. Clicking the white Other Options dropdown before any payments are taken allows you to charge the transaction to an active reservation or guest profile.
Charge to an Active Reservation: The Charge to reservation option can be used if the purchaser is a guest with an active reservation in the park. This means the reservation stay dates include the POS transaction date. To read more about this type of transaction and how to manage it, click on the blue hyperlinked feature name to be redirected. For a quick reference, the screenshot below shows what you will see in the POS Register.
Charge to guest account: The Charge to guest (no reservation) option can be used if the purchaser does not have a reservation with you but would like to have an item charged to their guest profile instead. To read more about this type of transaction and how to manage it, click on the blue hyperlinked feature name to be redirected. The screenshot below is an example of what you will see in the POS Register.
Print a Receipt and Start a New Transaction
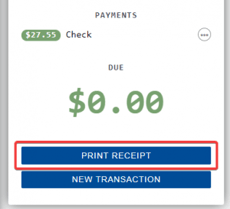
The Print Receipt button appears when the balance due is $0.00. If you have a Star brand printer and direct print enabled, a receipt will automatically be printed when the button is clicked.
Click Print Receipt to display and print the receipt
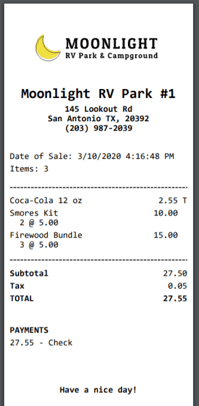
If you do not have a Star brand printer or direct print enabled, you will see a preview of the receipt in a new browser window when clicking the Print Receipt button. To print a POS payment receipt, you will use the browser's print functionality.
Example of a completed POS transaction receipt
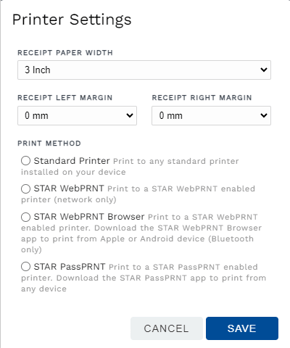
The POS register's default receipt width is 3 inches, which fits most standard receipt printers. If printing a POS receipt on a standard office printer, the receipt size does not change.
At the very bottom of the transaction summary box, you have three options to automate the receipt and new transaction portion of your POS transactions: Auto Print Receipt, Auto Email Receipt, Auto Next Transaction. These options may be enabled and disabled at any time. They take immediate effect for the current transaction.
Items in the cart of the POS Register may be edited to adjust quantity or price. This is especially helpful when selling multiples of the same item or when discounting an item.
In the POS Register, click an item's details line to display your action options.
Click in the price field to edit the amount.
Edit the quantity by clicking in the entry field or using the plus/minus buttons.
When you are finished editing, you may proceed with completing the transaction or click the item's line again to close the action display.
You can return an item from a POS transaction both before and after taking a payment. You may also process a refund for a point of sale transaction before or after returning an item.
IMPORTANT: Processing a refund or return may affect the status of a POS transaction. Here are few scenarios to be mindful of:
Issuing a refund without returning the item from the cart will leave an outstanding balance on the transaction. If the transaction is charged to a guest profile or reservation, the guest may receive overdue notifications if your property has enabled the email template.
Returning an item from the cart without issuing a refund will change the transactions status to Refund Pending. Process a refund for the returned item to resolve the pending refund and complete the transaction.
To return an item from a POS transaction:
Go to the Transaction
Click on the item to open the details
Click on the reverse arrow
To process a refund on a POS transaction:
Click the three dots next to the payment.
Select refund.
NOTE: Once a transaction receives a payment, no new items may be added to the cart.
If you wish to "resale" an item returned to a POS transaction with a payment, or sale a different item in place of the returned item, you will need to start a new transaction. You may use funds from the original transaction by refunding to cash or offline card and making a payment on the new transaction with the same payment method.
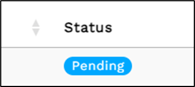
The pending status identifies a transaction that has POS items added but has not been paid or has only been partially paid. See the Pending Transactions section for more information.
Refund Pending
Refund pending identifies a transaction that has been paid in full but an item was returned in the cart, so the purchaser is due a refund for the item sale that was reversed.
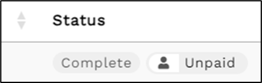
Complete
The complete status identifies a transaction that has been fully paid.
Complete/Paid- Linked to a reservation
The complete paid status with an image of an RV identifies a transaction that has been linked to a reservation and has been paid in full.
Complete/Unpaid- Linked to a Reservation
The complete unpaid status with an image of an RV identifies a transaction that has been linked to a reservation but has not been paid in full.
Complete/Unpaid Overdue - Linked to a Reservation If the complete transaction has a red Unpaid icon with an image of an RV, the transactions is linked to a reservation and the payment due date has passed. The transaction is officially past due. The guest may have received an email notification if there is an email on file and the POS Overdue Payment email template is set to Sending.
Complete/Paid- Linked to a Guest Profile
The complete paid status with an image of a person identifies a transaction that has been linked to the profile of a guest and has been paid in full.
Complete/Unpaid- Linked to a Guest Profile
The complete unpaid status with an image of a person identifies a transaction that has been linked to the profile of a guest but has not been paid in full.
Complete/Unpaid Overdue - Linked to a Guest Profile If the complete transaction has a red Unpaid icon with an image of a person, the transactions is linked to a guest profile and the payment due date has passed. The transaction is officially past due. The guest may have received an email notification if there is an email on file and the POS Overdue Payment email template is set to Sending.
There are two types of pending transactions you may see: Pending and Refund Rending.
A "Pending" status indicates a transaction with a balance due, that is not linked to a guest or reservation. This is essentially a suspended transaction. These are most commonly the result of items rang up in the POS register but the guest changed their mind or things got busy and the sale was abandoned to complete another task in the system. The section below walks you through resuming, satisfying, and cancelling "Pending" transactions.
A "Refund Pending" status indicates an item was returned after a payment and the guest is due a refund. A refund must be manually completed to satisfy these transactions as removing an item from the POS register's cart does not automatically process a refund to the guest. Users occasionally reach out after accidentally making returns in error. More information about either scenario is provided in the below.
Resume a "Pending" transaction.
You may come back to a pending transaction to complete it at any time. Here is how you resume a pending transaction:
Go to Point of Sale > POS Transactions
Enter any of the information shown below to find the transaction. If searching through a larger list of results, we recommend the Search filter to help you quickly find exactly what you are looking for.
Click on the transaction to open it.
You may now finish the transaction which might include adding more items, returning items, making a payment, or charging the transaction to a guest account or reservation.
Satisfy "Pending" status by charging to a guest or reservation.
For transactions that will be settled by the guest at a later time, you may satisfy the pending status if you charge to the guest account or charge to an active reservation. This changes the transaction's status to complete but still accurately reports the balance due, as we see in the screenshot below.
Cancel a pending transaction.
If a pending transaction is not going to be resumed, it can be canceled. This clears the transaction from the POS Transactions records as if it never happened.
Go to Point of Sale > POS Transactions
Click on a transaction to open it.
Click Cancel Transaction (pointed out below).
Satisfy "Refund Pending" status by completing a refund.
The default receipt width is 3 inches, which will fit most standard receipt printers. To customize the receipt width, on any transaction you can click on "Printer Settings" and update the information you wish to change:
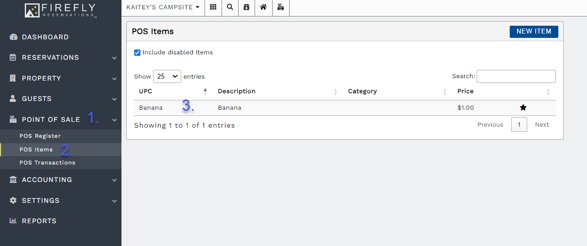
Go to Point of Sale > POS Items > open the item > enter the accurate quantity > Save.
Edit a Point of Sale Item
Point of Sale items are fully editable at any time. Navigate to the item going to Point of Sale > POS Items then click an item to open it and adjust any of its settings. For more information on the settings within an item's setup, see: Add POS Items
Disable Point of Sale Items
If you have an item that you no longer wish to use, you can disable (delete) this item. To delete an item, follow the steps below:
Click Point of Sale on the left menu
Click POS Items
Click on the item you wish to disable
Click "Delete" in the bottom left corner
Click "Delete the item" to confirm
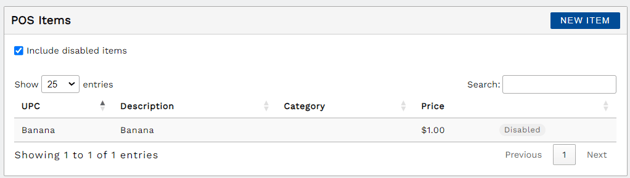
NOTE: To see a disabled item, check the box next to "Include disabled items" at the top of the POS Items screen.
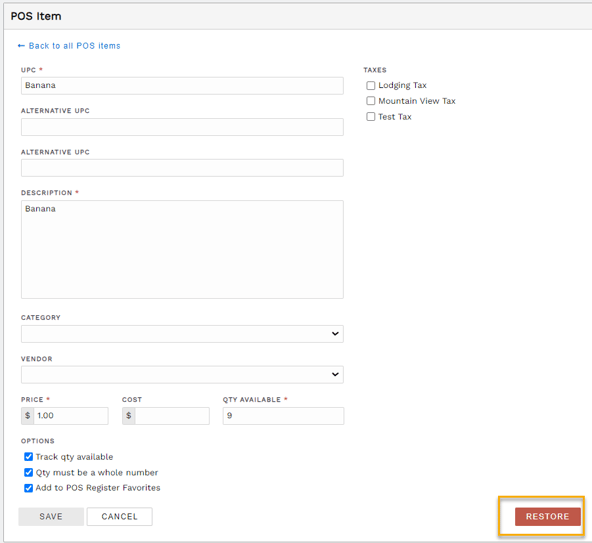
Restore Deleted Point of Sale Item
To reuse an item that was previously deleted you can restore any POS item.
Click Point of Sale
Click POS Items
Check the box next to "Include disabled items" at the top of the screen to include all disabled items
Click on the disabled item you wish to restore
Click the Restore button in the bottom right
Bulk Edit Taxes and Financial Accounts for Point of Sale Items
If your Point of Sale items are included in a POS category, you may edit the category's setup to edit all items associated with the category. Category setup may be edited to adjust the taxes and financial accounts associated with the POS items.
Go to Settings on the main menu.
Click POS Item Categories.
Find the category you wish to edit and click to open it.
Adjust the taxes collected or the associated financial accounts.


 POS register payment options with expedited buttons for cash and cards
 Cash dedicated payment menu opened with green Cash button
 Card dedicated payment menu opened with blue Credit/Debit Card button
 Add Payment button opens the full menu of payment method options

 Example of a completed POS transaction receipt