Last Updated: March 10, 2026
Link to Feature: https://app.fireflyreservations.com/Settings#reservations (or click here)
Quick Links
The Reservation Booking Process
- Search for available units
- Select One or More Units
- Vehicle Information
- Optional Add-ons
- Guest Contact Information
- Mandatory Policy Acceptance
- Payment and Reservation Information
- Reservation Success
Turn Off The Reservation Portal
Overview
Your reservation portal is the website your guests use to book reservations at your park. This article shares a sample of what the reservation booking process looks like for guests as well as what you may customize to personalize their experience and additional information around portal features.
The Reservation Booking Process
Search for Available Units
When visiting your reservation portal, a guest's booking experience begins on a page displaying your logo and a graphic you have chosen to represent your park.

1. Custom graphics: We highly recommend uploading a logo and custom image to create a good first impression. To upload these, go to Settings > Property > General Tab.
Without custom graphics, your park name displays above the entry fields in simple black text and a light gray background replaces the larger image shown above.
2. Reservation Portal Instructions: You may share additional instructions you would like the guest to have for making a reservation between the logo and the entry fields. Add a message here by going to Settings > Property > Reservations Tab. Scroll to the bottom of the page and enter text in the textbox under "Reservation Portal Instructions".
3. Reservation Type: First select the reservation type. Standard reservations are when the guest knows their departure date. Ongoing reservations are for guests who will be staying on an ongoing basis and will pay monthly. If a short term reservation is chosen, guests must enter the arrival and departure date range. The date range calendar that shows allows the guest to choose the range of their stay. If Long term reservation type is chosen, only the arrival date will be entered.
4. Adults/Children/Pets: Use the +/- buttons to increase or decrease the number of adults, children, and pets that will be guests. These selections will effect which units are available and the rate for the units. Each unit has a maximum occupancy and rates can increase depending on the number of occupants. Add occupant instructions underneath by going to Settings > Property > Reservations Tab. Find the "Reservation Portal Occupants Instructions" field.
5. Required RV Information (if RV Site): Enter information in required fields set in the Settings > Property > Reservations Tab > Available Unit Search Checkboxes. These inputs will effect which units are available and the rate for the units
6. Rate Qualifiers: If you have set up any rate qualifiers to be available on the reservation portal, a guest would choose one in this step.
After above information is completed, click 'Search Availability' to display all available units based on the form.
TIP: When directing website guests to your reservation portal, you may customize the search availability encountered by default. Check out this article for more information: Custom URL Parameters
Select One or More Units
When 'Search Availability' is clicked, all available units are displayed. Guests choose to view available units in a list or map display using the tabs at the top. Parks set the default view by going to Settings > Property > Reservations Tab.
If settings allow booking by unit, a guest may click a unit's picture to view the image in full size as well any other available images for the unit. Clicking the 'Book' button will add a unit to the checkout cart, and this can be done for any number of units. The guest is only limited by the park's setting of Max Units Bookable Per Reservation. After all desired units are selected, the guest will click 'Continue' to proceed with the booking.
 Viewing Available Units
Here are options you may adjust on your Property Settings' Reservation tab to customize what a customer will see when searching for a unit to book
- Allow guests to only view and book by unit class, not unit number: After entering their reservation details and clicking Search Availability, guests will be shown a list of unit classes with at least one available unit for the stay. Guests will not see a park map of units, or images or details for any specific unit. When enabling this option, be sure to include a description for your unit classes (Settings > Unit Classes).
NOTE: Enabling this option prevents or disables the selection of the next 3 options. - Show available unit classes before available units: Guests see a list of unit classes with the number of units available in each class. They select a class to view and book a unit.
- Show occupied units with availability calendar: Guests will see a blue hyperlink for a unit specific availability calendar when a unit is occupied. Allowing guests to only view and book by unit class will not display this option even if it is enabled.
- Show unavailable units with unavailable reason: This shows an Occupied or Unavailable status on unavailable units. For unavailable units, a red message explains the restriction that is not met or exceeded, which allows the guest to edit their search and try again if possible.
- Allow guests to join the Waitlist: When a unit is unavailable, guests will see a blue hyperlink option to "Join Waitlist".

Vehicle Information
If you require the collection of vehicle information, the next screen will prompt the guest to do so.
 Enter Vehicle Information
Optional Add-ons
If you offer add-ons to be purchased at the time of booking, they will be displayed next. Any add-ons that are set up to be shown on the reservation portal will be listed next for guests to purchase when making the reservation.
 Choose Add-ons if offered
Guest Contact Information
The next step is for the guest to enter in their personal details. The required fields are marked with a red star, these cannot be customized. Read here to learn about Firefly International guest support.
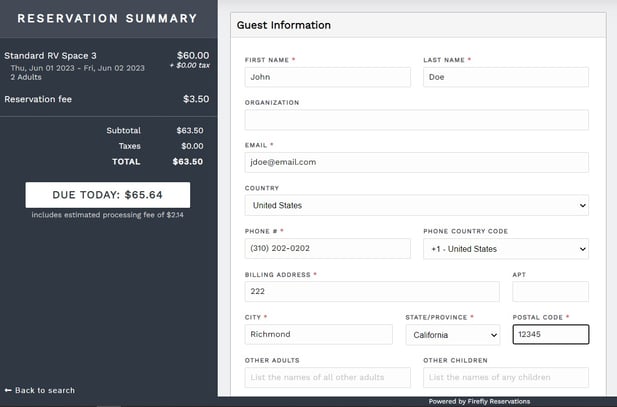 Guest Information Page
Mandatory Policy Acceptance
The policies page will be displayed next. This is a required step in the reservation portal booking process, providing your guest an opportunity to review your property's policies before completing their reservation. At minimum, a guest must sign to acknowledge agreement to the displayed policies in order to continue booking the unit. You also have to option to require a check box selection for confirmation of individual policy acceptance. If any policies are declined, the user will be returned to the previous page.
![]](https://fireflyreservations.com/hs-fs/hubfs/%5D.jpg?width=670&height=381&name=%5D.jpg) Guest are required to sign policies
Guest are required to sign policiesPayment and Reservation Information
The final step is for the guest to enter their credit card details. The payment section will only be displayed if you have set up payment processing and collect payment at the time of booking. The guest can also choose to let you know how they heard about you. These options can also be customized on the property settings page. If you have any coupons setup, this is wear the guest can apply coupons. Once the guest fills out all the fields and clicks 'Complete Reservation', the guest will see a final Reservation success screen to let them know the reservation was successful.
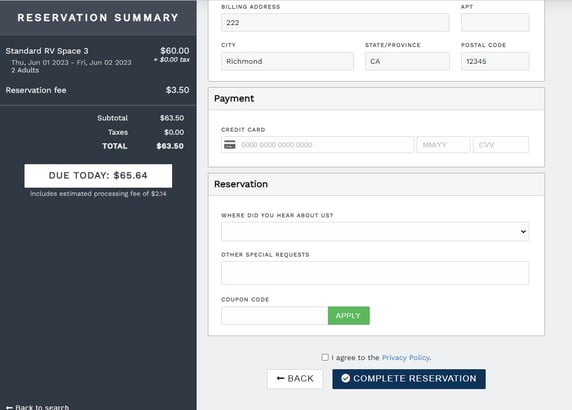 Enter Credit Card information and any other fields
 Reservation Success
Once the reservation success page is displayed, the guest will be shown a success message that is customizable by you on the Reservations tab in your property settings. This can be a simple thank you message with instructions on how to contact you and directions to your property. It can also include information about their reservation and a link to your guest portal so they can manage their reservation.
 A customizable reservation success message will be displayed once the reservation is complete
TIP: Instead of a Reservation Success message, shown above, you may choose to immediately redirect guests back to a specific page of your website. It's an easy change using the Redirect URL option on the Property Settings' Reservations tab.
Email Notifications
Once a new reservation has been made, your guest will get an email with details of their reservation and a link to the guest portal so they can view and manage their reservation. Also, you will receive an email to notify you of the new reservation that was just created. You can modify the email recipients of this new reservation notification email in your property settings under the 'Notifications' tab.
Turn Off The Reservation Portal
If you want to turn off your reservation portal completely from the public, you can turn off the reservation portal.
- From the main menu, click the Settings dropdown then select Property
- Click the Reservations tab
- Scroll to find "Reservation Portal Availability" setting and uncheck the box
- Click Save

🙋♀️ Still need help? Email: support@fireflyreservations.com and one of our technicians can help answer your questions.
💭 We would love to know if this article was helpful in addressing your issue. If you could answer the question below it will notify our team. Thank you!